VIEW ALL GALLERY LIGHTS
Showing posts with label templates. Show all posts

Friday, May 20, 2011

SimplexMag - a template for magazine or portfolio

This is my latest template ,I think it can be used for a blog ,or a portfolio ...

How to install this template

1,Download this template

2,Open  template file in a word editor ( wordpad ,notepad,notepad ++ ... )

3,To edit the main menu navigation


Find this code
<div class="menu-header">
                     <ul class="menu" id="menu-main-nav">
                         <li><a href="/search/label/test">Test</a>
                             <ul class="sub-menu">
                                 <li><a href="">Sub Category</a></li>
                                 <li><a href="">Sub Category</a></li>
                                 <li><a href="">Sub Category</a></li>
                             </ul>
                         </li>
                         <li><a href="">Career</a></li>
                         <li><a href="">Category</a></li>                       
                     </ul>
                 </div>

Add link to your categories in this code like this one
<li><a href="link_to_category">Category name</a></li>
link to a category in blogger has structure
http://your_blog.blogspot.com/search/label/category_name

4,To set the number of post showed in pages :

This template use numbered pagination script ,so you have to set number of posts per page in pagination script
Go to Blogger Dashboard ->Settings ->Formatting
in the box Show at most ....on the main page you will see the number of post showed in the main page . For example ,in the picture bellow ,the number of post in main page is 6

You can set another number .
Now ,back to template file ,find this code
<script type="text/javascript">
                                         var pageNaviConf = {
                                             perPage: 2,
                                             numPages: 2,
                                             firstText: "First",
                                             lastText: "Last",
                                             nextText: "Next",
                                             prevText: "Prev"
                                             }
                                     </script>

And change the value of perPage variable from 2 to the number we set at Show at most ...on the main page box .If we set the number of post in main page in Show at most ... on the main page 6 ,change the value of perPage from 2 to 6 .
Why we need this step ? To make sure the number of post per page exactly as we set . If you skip this step ,number of post on homepage is the number we set at Show at most ... box ,but click on the next page ,the number of post is only 2 (the value we set in perPage ) .

5,To add your social network accounts

find this code

<div class="social_media">
             <script src="http://s7.addthis.com/js/250/addthis_widget.js#username=xa-4c873bb26489d97f" type="text/javascript"></script>
                <a class="addthis_button_compact sharethis i_share at300m" href="http://www.addthis.com/bookmark.php?v=250&amp;username=xa-4c873bb26489d97f">
                 <span class="at300bs at15nc at15t_compact"></span>
             </a>                    
             <a class="i_rss" href="http://feeds.feedburner.com/Simplex"></a>
             <a class="i_twitter" href="http://twitter.com/dinhquanghuy"></a>    
             <a class="i_facebook" href="http://www.facebook.com/simplexdesignblog"></a>  
             <a class="i_flicker" href="#"></a>     
             <a class="top_btn" href="#"></a>
         </div>

and change link to your social network accounts

6,Upload template to Blogger .Then go to Dashboard -> Design ->Page Elements

7,To add logo

Click on edit link in header widget

In this widget , you can upload your logo image ,use text ...

8,To add the top ads

Click on edit link in Topads widget

Add the ad code to widget content

Do the same for Advertise widget in sidebar .

9,There are two widgets "latest resource" at the footer ,you can set these widget to show latest posts in a specific category .

Click on edit link in Latest resource widget

Add the title in Widget title ,and add the name of category which you want to show posts in widget content .

10,You can add your own widget in sidebar ,or in footer .

11,Save changes .

That's all for this template . I think it's very easy to install and use . Hope it helpful to you ,and feel free to give me feedbacks.

Saturday, May 7, 2011

Simplex Eshop - Blogger template for shopping cart/ecommerce

Some of you asked me for Ecommerce /shopping cart in Blogger platform . My result is template SimplexEshop .This is a test template and need more time to finish because every shop has its own options in shipping/tax rate/price/promotion  ,and fill all needs with only Javascript is an impossible mission . But I want to show it here to get your feedback and hope I can make it better .


Live Demo | Download

How to install this template

1,Download the template file .

2,Open template file in a word editor .

3, To make a menu navigation

Find this code
<ul id="nav">   
                     <li><a href="http://simplexeshop.blogspot.com">Home</a></li>
                     <li><a href="http://simplexeshop.blogspot.com/search/label/shop">Store</a>
                          <ul class="children">
                             <li><a href="">Category</a></li>
                               <li><a href="">Category</a></li>
                         </ul>
                     </li>
                     <li><a href="http://simplexeshop.blogspot.com/search/label/blog">Blog</a></li>                 
                 </ul>
Add link to your categories like my other template . You can see on Simplex Enews or Simplex Transcript for more about this multi-level menu .

4,Basic Shop Setting
This template was built based on SimpleCart solution (Simplecartjs.com ) , what I did only integrated Simplecart to a blogger template . So all options /setting for shop ,you can see in simplecart documentation .

a,Payment method 
This Template support two payment methods : Paypal and Google Checkout . Default is Paypal ,and it was set in these line :

simpleCart.email = "brett@wojodesign.com";
simpleCart.checkoutTo = PayPal;


If you want to use Paypal ,you can replace brett@wojodesign.com to your paypal email .
If you want to use Google Checkout ,you can replace two lines above with

simpleCart.merchantId = "111111111111111";
simpleCart.checkoutTo = GoogleCheckout;

Change 111111111111111 to your Google Checkout merchant ID .

b,Currency

This template support GBP,USD ,and EUR . Default is USD and it was set in this line

simpleCart.currency = USD;

if you want to change the currency ,you can change USD in the line above (marked in bold) to GBP or EUR .

c,Tax rate

The default tax rate was set in this line

simpleCart.taxRate  = 0.08;

You can change the value from 0.08 to another rate . If you don't want to add the tax rate ,you can delete this line

d,Shipping

There are many ways to calculating the shipping cost for an order :
-Add a flat rate to the entire order .This is the default method in template and it was set in this line

simpleCart.shippingFlatRate = 5.25;

(an amount 5.25 shipping cost will be added to the entire order )
You can change 5.25 to the value you want .

-Add a shipping cost to every item in the cart : if you want to use this method ,you can delete simpleCart.shippingFlatRate = 5.25;
and use this line
simpleCart.shippingQuantityRate = 3.00;
This line will add an amount 3.00 to every item in the cart .Of course ,you can change 3.00 to other value .

-Add a shipping cost as percentage of total cost : to use this method ,you can delete the default simpleCart.shippingFlatRate = 5.25;
and use this :
simpleCart.shippingTotalRate = 0.05;

This line will add a shipping cost as 5% to the total cost .You can change this rate to another value .

If you require some advanced calculations for shipping, you can delete the default line and use the prototype object for CartItems:

CartItem.prototype.shipping=function(){
// we are using a 'size' field to calculate the shipping,
// so we first make sure the item has a size
if(this.size){
if( this.size == 'small' ){
return this.quantity*5.00;
} else if( this.size == 'large') {
return this.quantity*7.50;
} else {
return this.quantity*10.00;
}
} else {
// use a default of $2.00 per item if there is no 'size' field
return this.quantity*2.00;
}
}

The 'this' here refers to the item, and we are using a 'size' field and the item 'quantity' to calculate the shipping. Because an item may or may not have a size, we check to make sure it does with the 'if(this.size)'. If there is a size field, we use a different rate for each size and return a value based on the item quantity. Otherwise, we use a base rate of 2.00. simpleCart(js) will use the global shipping rates, and then add the shipping value for each item in the cart.


5,When you finish editing ,upload template to Blogger . Go to Dashboard ->Design ->Page elements

6,To add logo

click on logo widget

add logo as this image bellow

7,There are many places that you can add your own widget . For example ,you can add link list widget for making category menu ,subscription widget ,page list widget ...

8,That's all for install this template .

How to use this template

It's a little bit difficult when using this template .

To post product to shop : Go to Dashboard -> Posting -> New Post .Click on Edit HTML and made a post with this structure
<div id="description">
<img src="image url goes here">

PRODUCT INFORMATION..........
........................

</div>
<div class="simpleCart_shelfItem">
<span class="item_name">item name ...</span>
Price : <span class="item_price">price .........</span>
Quatity : <input class="item_quantity" type="text" value="1" />
<a href="javascript:;" class="item_add" title="Add to Cart">Add to Cart</a>
 </div>

In structure above , this is the product information section :
<div id="description">
<img src="image url goes here">

PRODUCT INFORMATION GOES HERE..........
........................

</div>

you can add image by using <img src="image url goes here"> and add product description bellow (in the text product information goes here )
After the product information section ,we move to add to cart section :

<div class="simpleCart_shelfItem">
<span class="item_name">item name ...</span>
Price : <span class="item_price">price .........</span>
Quatity : <input class="item_quantity" type="text" value="1" />
<a href="javascript:;" class="item_add" title="Add to Cart">Add to Cart</a>
 </div>

in this section ,add the item name in where I marked item name .... ,add the price in where I marked price ... and change the quatity from '1' to another value .

If you want to set a special shipping cost for this item only ,you can add this line to the add to cart section
<input class="item_shipping" value="xxx" type="hidden">
replace xxx to the shipping cost of this item
and the code of Add to cart section will become :
<div class="simpleCart_shelfItem">
<span class="item_name">item name ...</span>
Price : <span class="item_price">price .........</span>
Quatity : <input class="item_quantity" type="text" value="1" />
<input class="item_shipping" value="xxx" type="hidden">
<a href="javascript:;" class="item_add" title="Add to Cart">Add to Cart</a>
 </div>


When you set shipping cost for an item ,the method which used to calculate shipping fee in step 4 will be overide .

After finish editing the post with structure above ,add a label 'shop' at the end of post ,and the product will be added to shop with sliders ,price and add to cart function

To post to Blog : to post to blog ,you can make a normal post ,and add a label 'blog' at the end of post .

It's similar to my older template Simplex Portfolio ,in Simplex Portfolio ,we have two display mode : display a post as a post in gallery ,and display a post as a normal blog post .In this template ,we also have two display mode : display a post as product in shop and display a post as a normal blog post .

For the page : you can make pages as normal .

That's all for this template . I think it is not easy to use and handle .If you familliar with the code ,you can take a try ^^ For detail shopping cart settings ,you can see more in simplecartjs 
Feel free to leave me feedbacks

Wednesday, March 9, 2011

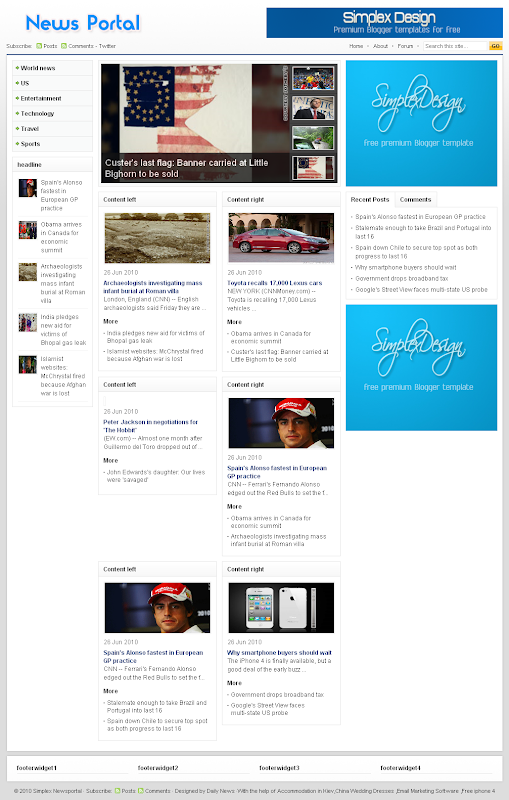
SimplexNewsportal - renewed version

Here is the renewed version of my template SimplexNewsportal . It's a good template for magazine and newsportal . I tried my best to make it easier to install and use .
There are two file for this template ,one with Disqus comment system and the other not .I added images folder to template package ,so if you want ,you can host images yourself


Live Demo | Download template with Disqus comment system | Download template with Blogger comment system

Here are steps for installing this template

1,Download template file .

2,If you want to use Disqus comment system
Open this template in a word editor and change the text in bold in this code
 <script type='text/javascript'>
    /* * * CONFIGURATION VARIABLES: EDIT BEFORE PASTING INTO YOUR WEBPAGE * * */
    var disqus_shortname = &#39;simplexcelebs&#39;; // required: replace example with your forum shortname

    // The following are highly recommended additional parameters. Remove the slashes in front to use.
    // var disqus_identifier = &#39;unique_dynamic_id_1234&#39;;
    // var disqus_url = &#39;http://example.com/permalink-to-page.html&#39;;

    /* * * DON&#39;T EDIT BELOW THIS LINE * * */
    (function() {
        var dsq = document.createElement(&#39;script&#39;); dsq.type = &#39;text/javascript&#39;; dsq.async = true;
        dsq.src = &#39;http://&#39; + disqus_shortname + &#39;.disqus.com/embed.js&#39;;
        (document.getElementsByTagName(&#39;head&#39;)[0] || document.getElementsByTagName(&#39;body&#39;)[0]).appendChild(dsq);
    })();
</script>

and this code

<div class='dsq-widget' id='recentcomments'>&lt;script type=&quot;text/javascript&quot; src=&quot;http://simplexenews.disqus.com/recent_comments_widget.js?num_items=5&amp;hide_avatars=0&amp;avatar_size=32&amp;excerpt_length=200&quot;&gt;&lt;/script&gt;</div>
to your Disqus shortname .This step is required . If you choose template file without Disqus ,you can skip this step .

3,Upload template to Blogger

4,To add logo


click on edit link in logo widget

add logo into widget content like this

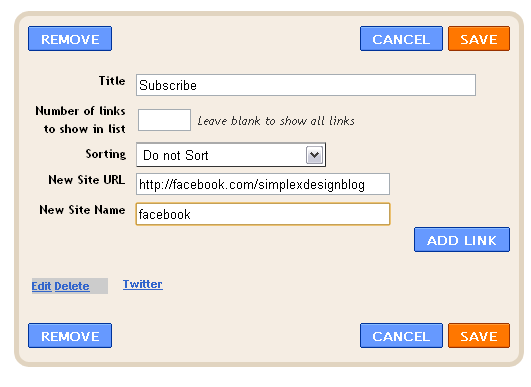
5,To add  link to your social network

click on Subscribe widget

add link to your social network accounts.

6,To add items to menu

click on edit link in menu widget

add link to your categories

Link to category in blogspot has structure http://yourblog.blogspot.com/search/label/category name

7,To show content in headline widget

click on edit link in headline widget

add the name of category you want to show in this widget

8,To show content in feature content slider

click on edit link in feature content slider

add name of category you want to show in slider into widget content

9,Do the same for content left ,content right widgets .Just add a category name into widget content ,and recent posts in this category will be shown in widget's position in homepage .

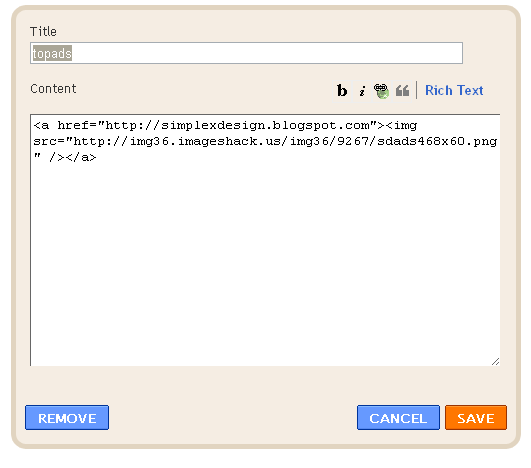
10,Top ads,ads1 ,ads2 are widgets for advertisment . To add your ads

click on edit link

add your ad code into widget content .

11,You can add your own widgets if you want

12, To add a forum ,create a page (Go to Dashboard-Posting tab ->Edit Pages,click on new page) , name it "forum" and then paste the forum embeded code into page content (in Edit HTML mode)


After that , go to Dashboard -> Go to Design -> Edit HTML ,search for the text 'http://simplexnewsportal1.blogspot.com/p/forum.html'

and replace it with link to 'forum' page you've just created .There are 3 places need to change in total .
1st place
1st
2nd
2nd
3rd
3rd
After that ,save the changes .

13,To increase/decrease the number of post in each category ,go to Design ->edit HTML -> checked Expand widget templates ,and find these variables in template file :
numposts = 3;
numposts1 = 4;
numposts2 = 6;

try to change these values to what you need .
That's all for this template . I hope you like this re-newed version .

Sunday, February 20, 2011

SimplexBuzz - one more premium template

This is my latest template SimplexBuzz . This template has a eye-catching feature slider ,and I think it's good for travel/art/photography blog .

Live Demo | Download

Here are steps to install this template


1,Download template file

2,Open template file in any word editor you have .

3,To change the credit box at the end of each post

find this code
<div id="authorbox">
<h3>About Author</h3>
<img width="60" height="60" class="avatar avatar-60 photo" src="https://blogger.googleusercontent.com/img/b/R29vZ2xl/AVvXsEil4WuM8VNbUjLfBk2X2jq2Xqk09xT39RO-Z5PHYW59m3B_DuYurJvZ_71oVdJHX0DGrsHZerhGP_5Ysr8rcBUnEHS8RF5_FAnbwQiU4BejYJLHHSA6SuGzu4La-tGtW00UTYGFpo_RZdO1/s220/normal_HNH_9244-sapa0207.jpg" alt=""/>
<div class="authortext">
<h4>
<a href="">Nhamnganhanh</a>
</h4>
<p>This is template SimplexBuzz .
</p>
</div>
</div>

Change the text in bold to what you want (you can write some description about you and your blog ...)

4, To add your feedburner account to email subscription form

find this code
<form onsubmit="window.open('http://feedburner.google.com/fb/a/mailverify?uri=simplex', 'popupwindow', 'scrollbars=yes,width=550,height=520');return true" target="popupwindow" method="post" action="http://feedburner.google.com/fb/a/mailverify">
                                  <fieldset>
                                     <input type="hidden" name="uri" value="simplex"/>
                                     <input type="hidden" value="en_US" name="loc"/>
                                     <input type="text" name="email" class="sub"/>
                                     <button type="submit">Submit</button>
                                 </fieldset>
                             </form>
change the text in bold 'simplex' to your feed burner account .

5,To add your social network accounts

find this code
<ul class="social">
                                 <li><a class="twitter" href="http://twitter.com/dinhquanghuy">Twitter</a></li>
                                 <li><a class="facebook" href="http://facebook.com/simplexdesignblog">Facebook</a></li>
                                 <li><a class="flickr" href="http://flickr.com/photos/">Flickr</a></li>
                                 <li class="rss"><a class="rss" href="/feeds/posts/default">RSS</a></li>
                             </ul>
change the links (marked in bold) to your social network accounts.
6,After that ,upload template to Blogger .

7,To add your logo

click on logo widget

then add your logo into widget content as I did in picture below

Click Save

8,To add items to top menu navigation

click edit link in category widget

then add link to your category into widget content like this

Link to category in blogspot has structure : http://yourblogspot.blogspot.com/search/label/your category

9,To add content to feature slider

Click on edit link in 'feature content slider' widget
Then add the name category which you want to show recent posts in feature content slider in widget content
for example ,I want to show recent posts under 'travel' category into feature content slider ,I click edit link in 'feature content slider' widget

then fill the widget content with name of category 'travel'

Save changes . From now ,4 latest posts in category 'travel' will be showed in feature slider

10,To show post in feature content section below slider

click on edit link in feature content widget

add name of category you want to show into widget content

Then save changes . Recent posts in this category will be showed in feature content section .

11,In this template , when you enter a single post ,the first image in this post will be showed as background in header automatically .
But when you enter a page ,there's no image displayed in header .
To add image in the header of pages

click on edit link in 'background for page' widget

and add the image into widget content .

From now ,the image you added will be showed as header's background each time you enter a page .

12,To add the text in alert box

click on edit link in 'alert' widget

and enter the text you want to show .

You can use HTML tags to make text in alert box display as you want .

13,To add your ad,click on edit link in banner widget

and add your ad code into widget content .


14, That's all for default widgets .You can add more widget or remove existed as you want .

Save all changes ,and you are done .I hope you all like this template and keep supporting me .
Feel free to use my template but please keep the credit at footer .Thanks in advance .

Update : As question from YUSUF left in my blog related to problems on long post titles and width of post in home page ,here is the solution
Find this

div.post h2.storyTitle {
color: #000000;
float: none;
font-size: 2.6em;
font-weight: bold;
line-height: 120%;
margin-bottom: 5px;
width: 585px;
}
and delete width: 585px;
Then find

div.post div.storyContent {
float: none;
margin-bottom: 20px;
width: 585px;
}
delete width: 585px;
To fix the problem with recent posts/comments tab when post title is long :
First ,find this

div#sidebar div.tabsContainer ul.panes ul li h4 {
left: 70px;
position: absolute;
top: 15px;
}
and delete all of them
Second ,find this

div#sidebar div.tabsContainer ul.panes ul li p.meta {
bottom: 0;
color: #85837E;
font-size: 0.9em;
left: 70px;
line-height: 120%;
overflow: hidden;
position: absolute;
}
Then change it to

div#sidebar div.tabsContainer ul.panes ul li p.meta {
color: #85837E;
font-size: 0.9em;
line-height: 120%;
margin-left: 60px;
}

the last step : Find this

div#sidebar div.tabsContainer ul.panes ul.comments li h4 {left:35px; width:250px;}
And replace it with

div#sidebar div.tabsContainer ul.panes ul.comments li h4 {
margin-left: 20px;
}