VIEW ALL GALLERY LIGHTS

Wednesday, September 30, 2009

Simplex gallery ,blogspot template for photo gallery site

There are a newer version for this template . The download link is provided in this post.

I always believe that blogspot and wordpress are the easiest publishing platforms for everyone . And they can do any task a website base on other platform can do .
I go around some photo gallery websites ,some of them base on PHP and the others base on Flash . So I made this template in blogspot for everyone know that blogspot can do most of work others platform can do .
This template is named Simplex gallery .It's specific for gallery website .
here is the screenshot

Photobucket

Live demo
| Download

In this template ,I integrated all javascript ,so you don't need to upload any javascript files .
To install this template ,follow these steps :
1. download it ,extract .
2.Open template file in any word editor you have,change the URLs in template file . You need to change url in this section : <div id="header"> ..... </div> . Find and replace
http://nhamngahanh-gallery.blogspot.com/... with your urls
3.Upload template to blogspot .
Done
How to use :
To post your images ,open your blog editor , upload your image .Each post contain only one image ,no more ,so upload one image in each post .
Choose edit in HTML mode ,keep only img tag like this :
<img src="your image url" title="title of your image - required" />
remove other tags and any things else .
Noname
add labels for post then publish .


huy signature

Label cloud for blogspot

Label cloud is now available in blogspot . Instead of modifying template code ,now we can add this function to blogspot easily .
When you add label widget to your blogspot ,there's an option for list and cloud appearance . Choose cloud and click save .Now blogspot will display your labels as cloud .
Label Cloud 1
and here is result .
Label Cloud DEMO

huy signature

Disable right click on blogspot

Many blogger don't like their unique content copied by any others . To prevent copying content in your blog ,the easiest way is disable right click on blogspot . I know this method is very simple and it can't prevent professional copiers . But it's still a good one .

This widget is very simple to install into your blog
Following are the steps

Step 1 > Go to Template -> Page Elements.
Step 2 > Add a Page Element -> then Add a HTML
Step 3 > Now just copy and save the following code into Html and you are done !

<script language='JavaScript'>
<!--

//Disable right mouse click Script
//By Maximus (maximus@nsimail.com) w/ mods by DynamicDrive
//For full source code, visit http://www.dynamicdrive.com

var message="No Right-Click!";

///////////////////////////////////
function clickIE4(){
if (event.button==2){
alert(message);
return false;
}
}

function clickNS4(e){
if (document.layers||document.getElementById&&!document.all){
if (e.which==2||e.which==3){
alert(message);
return false;
}
}
}

if (document.layers){
document.captureEvents(Event.MOUSEDOWN);
document.onmousedown=clickNS4;
}
else if (document.all&&!document.getElementById){
document.onmousedown=clickIE4;
}

document.oncontextmenu=new Function("alert(message);return false")

// -->
</script>


huy signature

adding signature to your blogspot posts

If you like the look and personalization of having a signature like this:
huy signature
at the end of your posts, try this:

Go to My Live Signature. Click on "proceed" and "create signature".

Follow their instructions .When you finish ,you will get your own signature on PC . The whole process to create signature online is very interesting and fun :))

Save your final product in PC and upload it to image hosting service such as flickr,photobucket

Login to your blogger account. Click on "Settings" in your blog dashboard, and then "formatting". Scroll down to the bottom where it says "post template."

Paste the code below :
<img src="your_image_url" width="...." height="...." alt="huy signature" />

change "your_image_url" to your signature photo url on image hosting service . Adjust the width and height for your site .
Ok ,you are done .

When you next go to make a new post, that code will already be in it. Just make sure you type your post *above* the code, or your signature will come first in your post.

Sticky post in blogspot

If you want readers to see a particular post ,message ,announcement when they visit your website ,you need to make this post sticky post .To make a sticky post ,you can do several ways ,you can edit the template for showing a specific post ,or easier ,changing post date.

Change the Post Date Method

Posts in blogspot is ordered as time order . If you change your post date to a future date like the year 2015 ,the post will stand in first position permanently .
Open your post editor and change the date to future . Done

Sticky Posts in Blogger

Important Notes:

i) In the new Blogger platform, the URL of Posts follow the month and year that are specified in the “Post month and date” option. In our example, we specified the month as August and the year as 2015. The Post URL will be http://BLOG URL/2015/08/TITLE.html. This URL will remain unchanged even if you edit the post and alter the date. Good for us. It means that we can change the date of an earlier post without affecting the backlinks to that post. People who linked to that URL will not have to change the link address.

ii) You can therefore alter an existing post in the same manner. Edit the Post. Change the year to a much later year and the post will always appear on your Home page.

iii) The other point to note is that when the year 2015 arrives, you may have to alter the post date yet again to another later date. Who knows, perhaps by then you may not want that post to appear on your Home Page anymore.

iv) If you want a recent post to be stored somewhere at the end of your archive list, and never to appear in the list of recent posts, use the same method but change the date to an earlier date, a year like 1950.

Monday, September 28, 2009

working version of iCarousel


I want to make an image gallery for blogspot templates .I found icarousel script can do this work quite well and it's exactly what I need . ICarousel is javascript written on Mootools framework and it can make carousel effect likes widgets . Here is the demo of icarousel and here is documentation
I spent all day time trying to apply this script to my template but I got no result . It didn't work .
I finally find out the answer in a forum on javascript . The answer is very easy to undestand .The owner of script hide some parts of script in documentation so no one can make it work except its owner .
Jamie Dale at jdale.net debugged icarousel code and he offer a tweaked version of icarousel script . You can find it here .
I tested the script in J.Dale website and it work properly .
Thanks Jamie Dale for his working .

Saturday, September 26, 2009

The easiest way to create related posts for Blogspot

Showing related post at the bottom of each post will help your reader find more information related to the topic . It's also helpful in SEO and indexed in search engine .
In Wordpress ,there are many way to create related posts list and its accuracy is high ,but in blogspot , related post function is based on label of post so in some case ,I think the result is not as you want . But it can be acceptable.

To create related post in blogspot ,follow these steps below

1. Login to Blogger
 

2. Go to "Layout-->Edit HTML"
 

3. Click on "Expand Widgets Template" checkbox.
 

4.Paste this code after ]]></b:skin> :

<script type='text/javascript'>
//<![CDATA[
var relatedTitles = new Array();
var relatedTitlesNum = 0;
var relatedUrls = new Array();
function related_results_labels(json) {
for (var i = 0; i < json.feed.entry.length; i++) {
var entry = json.feed.entry[i];
relatedTitles[relatedTitlesNum] = entry.title.$t;
for (var k = 0; k < entry.link.length; k++) {
if (entry.link[k].rel == 'alternate') {
relatedUrls[relatedTitlesNum] = entry.link[k].href;
relatedTitlesNum++;
break;
}
}
}
}
function removeRelatedDuplicates() {
var tmp = new Array(0);
var tmp2 = new Array(0);
for(var i = 0; i < relatedUrls.length; i++) {
if(!contains(tmp, relatedUrls[i])) {
tmp.length += 1;
tmp[tmp.length - 1] = relatedUrls[i];
tmp2.length += 1;
tmp2[tmp2.length - 1] = relatedTitles[i];
}
}
relatedTitles = tmp2;
relatedUrls = tmp;
}
function contains(a, e) {
for(var j = 0; j < a.length; j++) if (a[j]==e) return true;
return false;
}
function printRelatedLabels() {
var r = Math.floor((relatedTitles.length - 1) * Math.random());
var i = 0;

while (i < relatedTitles.length && i < 20) {
document.write('<li><a href="' + relatedUrls[r] + '">' + relatedTitles[r] + '</a></li>');
if (r < relatedTitles.length - 1) {
r++;
} else {
r = 0;
}
i++;
}

}
//]]>
</script>

4. Paste the script after this code : <data:post.body/>. If you have "Read more widget" you will find two codes. Put it under the first code.
<b:if cond='data:blog.pageType == &quot;item&quot;'>
<p>Related Posts : </p>
<ol>
<b:loop values='data:post.labels' var='label'>
<b:if cond='data:blog.pageType == &quot;item&quot;'>
<script expr:src='&quot;/feeds/posts/default/-/&quot; + data:label.name + &quot;?alt=json-in-script&amp;callback=related_results_labels&amp;max-results=5&quot;' type='text/javascript'/> </b:if></b:loop>
<script type='text/javascript'> removeRelatedDuplicates(); printRelatedLabels(); </script>
</ol>
</b:if>
7. Save your template.


We are done ! Check your blog for result .

Friday, September 25, 2009

10 Free File Storage Websites

We need file storage service to back up and transport files . Instead of using an USB flash drive ,we can upload files to internet and send links to my friend . There are many website offer storage service ,but most of them ask for money .

I’ve had a look around for the best in online file storage, offering the user hassle free ways of backing up and collaborating files. Of course ,there's always limit for storage and if you want more ,you have to pay for an account .

1. Dropbox

Sync files of any size or type, share large files and photos easily, automatic online backup and track and undo changes to files. Upload by their program and the limit for storage is 2gb free .

2. Skydrive

Skydrive is a storage service of microsoft .They offer 25gb free in their server for storing files .

3. Mediamax

Automated backups, encryption on data and web based backups. Just 2gb free .

4. Box

A comprehensive backup service with several key features such as mobile access, facebook integration, file commenting and account importing. But their storage limit is 1gb.

5.4shared

5gb for free storage . Their file manager is easy to use ,look like Window Explorer .

6. Rapidshare

The biggest one in storage service providers . I stored most of my files here and I have no trouble with their service .When downloading file from them ,as free member ,you have to wait 60s for new downloads.

7. Media Fire

Unlimited storage, downloads and uploads with no software to install. This is one of the best storage website because their speed and support . I love it .

8. Esnip

5gb for free storage .Easy to use and upload .

9. Megaupload

Free 200 GB online storage with file manager and completely free basic service. Time to upload is a bit slow ,but file will be kept for a long time .

10. YouSendIt

Send, receive and track large and important files. But we should use it for transferring file ,not for back up because file will be deleted after 2 weeks .

Are there any file sharing services that you’d recommend? If so let me know via commenting below.

Erotic painting. Chris Lopez.

The art-works of Spanish artist Cristobal Sanchez-Lopez. The bears-men executed by a watercolor look easily and elegantly.

David. Original Watercolor. 8x10


Nude 12. Original Watercolor. 8x10


Nude 46. Original Watercolor. 8x10


Anonymous II. Original Watercolor. 8x10


Website: http://www.lopezgallery.com/

Erotic drawing and painting. Fernando Garcia-Vazquez.

A series "Calvin" of Spanish artist and sculptor Fernando Garcia-Vazquez. The art-works executed by special technics Silverpoint. Silverpoint and white oil on prepared and coloured paper.

Juxtapose 1


Juxtapose 2


Juxtapose 3


Website: http://www.members.shaw.ca/fernando-a-garcia/

Use imeem to post music on your blogspot

Here is the demo :


to post music in blogspot ,you need to find a service to host your music . In this post ,I use Imeem.com .
At first ,you need to register an account in imeem.com . When you get an account in imeem available for use ,login .
When you logged in your account ,click the down arrow on the right of My Home tab .In dropdown menu ,click upload .
In Upload page ,if you got Adobe Air installed on your PC ,you can upload your file by Imeem uploader . If not ,click on Web uploader . Upload using Imeem uploader and Adobe Air faster than web uploader but it need time to install .
When your music file is uploaded ,click on recent uploads tab ,click on the file name

A new page showed .


click and copy all code lines in embed box . If you want music auto play ,check the Auto Play box bellow .
Open Blogger editor ,choose edit html ,paste the code you copied .
Ok ,now the music can be played in your blogspot post .
I have a small notice . The code lines you copy from embed box contain not only code for music player but also contain advertisement code . In order to avoiding advertisements when playing music ,keep the code within <object> </object> and remove the rest . like this one .


Done ! Let's enjoy the music

Readmore function for blogspot

Readmore from Blogger

Blogger announced readmore function is now available .
To use this function , just click button in image bellow if you use new blogger editor tool

blogger editor
if you use old blogger editor tool ,just add this code <!-- more --> in edit HTML mode
blogger editor

like Wordpress ,a part of your post from where you insert readmore code to the beginning of post is considered post summary .

The only templates this method will not work with is those which have added an automatic post summaries hack, which summarizes the posts based on the number of characters or words. This is because such customizations ignore any code added to the body of our blog posts and don't register Blogger's Jump Links.

If you'd prefer to use Blogger's Read More function than your current automatic post summaries, follow these steps :

1.Find this line <data:post.body/>
2.Remove references to the post summaries script - anything between the <script> and </script> tags used for your particular method
2.insert these code lines right after <data:post.body/>
<b:if cond='data:post.hasJumpLink'>
<div class='jump-link'>
<a expr:href='data:post.url + "#more"'><data:post.jumpText/></a>
</div>
</b:if >
and here is the result of blogger readmore function

Auto readmore

Because Readmore function of Blogger is manual readmore function ,you have to insert code to mark post summary by yourself. So I'd like an auto version which create post summary automatically .

Here is instruction for adding auto readmore function to blogspot by Anhvo .

1.Open your template

2.Find this line <data:post.body/>

3.Replace <data:post.body/> by these line :

<b:if cond='data:blog.pageType != "item"'>
<div expr:id='"summary" + data:post.id' style='display:none;'><data:post.body/></div>
<script type='text/javascript'>createSummaryAndThumb("summary<data:post.id/>");</script>
<div style="clear:both" align='right' class='rmlink'><a expr:href='data:post.url'>-->��c tiếp...</a></div>
</b:if>
<b:if cond='data:blog.pageType == "item"'><data:post.body/></b:if>
4.insert these line after </head>
<!--
/*****************************************************
Auto-readmore link script, version 4.0 (for blogspot)
(C)2009 by Anhvo
Homepage: http://vietwebguide.com
Please dont remove this copyright or change it into your own
******************************************************/
-->

<style type="text/css">
.thumbnailimg IMG {
max-width:150px;
width: expression(this.width > 150 ? 150: true);
max-height:120px;
height: expression(this.height > 120 ? 120: true);

}
.thumbnailimg {
float:left;
padding:0px 10px 5px 0px;
}
</style>
<script type='text/javascript'>
var thumbnail_mode = "no-float" ;
var classicMode = false ;
var summary_noimg = 50;
var summary_img = 40;
var indent = 3;
</script>
<script type='text/javascript'>
//<![CDATA[
function stripHtmlTags(s,max){return s.replace(/<.*?>/ig, '').split(/\s+/).slice(0,max-1).join(' ')}

function getSummaryLikeWP(id) {
return document.getElementById(id).innerHTML.split(/<!--\s*more\s*-->/)[0];
}

function getSummaryImproved(post,max){
var re = /<.*?>/gi
var re2 = /<br.*?>/gi
var re3 = /(<\/{1}p>)|(<\/{1}div>)/gi
var re4 = /(<style.*?\/{1}style>)|(<script.*?\/{1}script>)|(<table.*?\/{1}table>)|(<form.*?\/{1}form>)|(<code.*?\/{1}code>)|(<pre.*?\/{1}pre>)/gi

post = post.replace(re4,'')
post = post.replace(re3,'<br /> ').split(re2)

for(var i=0; i<post.length; i++){
post[i] = post[i].replace(re,'');
}
var post2 = new Array();
for(var i in post) {
//if(post[i]!='' && post[i]!=' ' && post[i] != '\n') post2.push(post[i]);
if(/[a-zA-Z0-9]/.test(post[i])) post2.push(post[i]) ;

}


var s = "";
var indentBlank = "";
for(var i=0;i<indent;i++){
indentBlank += " ";
}
if(post2.join('<br/>').split(' ').length < max-1 ){
s = post2.join(indentBlank +' <br/>');
} else {
var i = 0;
while(s.split(' ').length < max){
s += indentBlank + ' ' + post2[i]+'<br/>';
i++;
}
}
return s;
}


function createSummaryAndThumb(pID){
var div = document.getElementById(pID);
var content = div.innerHTML;
if (/<!--\s*more\s*-->/.test(content)) {
div.innerHTML = getSummaryLikeWP(pID);
div.style.display = "block";
}
else {

var imgtag = "";
var img = div.getElementsByTagName("img");
var summ = summary_noimg;
if(img.length>=1) {
if(thumbnail_mode == "float") {
imgtag = '<span class="thumbnailimg"><img src="'+img[0].src+'" /></span>';
summ = summary_img;
} else {
imgtag = '<div class="thumbnailimg" align="center"><img src="'+img[0].src+'" /></div>';
summ = summary_img;
}
}

var summary = (classicMode) ? imgtag + '<div>' + stripHtmlTags(content,summ) + '</div>' : imgtag + '<div>' + getSummaryImproved(content,summ) + '</div>';

div.innerHTML = summary;
div.style.display = "block";
}
}
//]]>
</script>

in the code above :
-150 and 120 are width and height of thumbnail image .Change these to your own
-Value 'false' for classicMode mean Blogger readmore function is off . You can change this value to "true" and use Blogger readmore function as I mention above .
-value 60 for summary_noimg mean the maximum word for summaries without image are 60
-value 50 for summary_img mean the maximum word for summaries with image are 50
Note:
With this method ,if you want to show post summary as Blogger readmore function ,just insert
<!-- more --> to separate summary and the rest of your post


In this post ,I recommend you two methods for show post summaries . If you find anything wrong or get another ideas for these methods ,please give me some comments

Thursday, September 24, 2009

Simple but good : 10 awesome websites in minimalist style

I love minimalist design style . And here are 10 awesome minimalist websites in the list of Uniroom .
As well as some really minimal design elements, these sites contain some great grid layouts.

508switch

bigger_design

druckbar

ignacioricci

inkcover

marianaonate

ribbons_of_red

simonamunteanu

super_normal

twelve_south

Google does not use the keywords meta tag in web ranking

Google made historic news yesterday by declaring they do not use the meta keywords tag. They haven't used the meta keywords tag for an incredibly long time and any "SEO" should know that.
I guess they want to focus on high-quality-posts ,and preventing low-quality post or copied posts trying to cheat ranking-system by any SEO method .

So there are official posts from Matt Cutts, the Google Blog and Search Engine Land .We can trust this information is true ,not a joke .

If you want to know which meta tags Google does pay attention to, see this FAQ. Plus, Googler's JohnMu tweeted that Google also does "not adhere to the "revisit-after" meta tag," if you wanted to know.

Finally, here is a video on Google Blog

Wednesday, September 23, 2009

Releasing a new blogspot template

I made a little hack in this template ,so it can show thumbnail in sub-news section . I also upload necessary pictures to imageshack.us ,so bandwidth is not limited . I hope this helpful to you 
You can download new version here
Download


I believe that blogspot can do everything that wordpress can . Yes ,of course ,it need time to make the function available such as readmore ,recent post ,recent comment ,show posts in their categories . But anyway ,nothing is impossible .

Here is my latest blogspot template . The layout from WPNewspaper template ,designed by gabfirethemes .Base on this web layout ,I added code for make it available in Blogspot .

It's a completely magazine template . Like no others blogspot template in magazine style only arrange their post in column like newspaper ,in this template ,Posts is showed as its wordpress template version .

Simplex Newspaper screenshot

Live Demo | Download

Main Features:

* Automatic Thumbnails on posts
* Automatic Post Summarize
* Showed newest posts in each categories
* Ads block ready
* Change images and logo easily
* Youtube Video embedding Integrated
* Fully SEO Optimized
* Added a Photo gallery
* Thumbnails on Recent Posts in Sidebar
* Integrated Search box
* Beautiful top Navigation bar
* Cross-browser compatible
* and many more....

How to install Simplex Newspaper template


1,Download template and extract it .You get one xml file and one folder contain images .

2,Upload all images in folder to a photo hosting service such as photobucket .

3,Open the xml file , Change all links : http://i604.photobucket.com/albums/tt130/metalner/simplexnews/... to the link of your images on hosting service .

4,Change all links :http://nhamngahanh.blogspot.com to your own blog address .Change link of each category in topbar,menubar,footer and change the subscribe address to yours.

5,if you want to change image or logo to yours ,just make your own logo or image and put the link in template file .

6,I noted the meaning of some variables in xml file ,so if you want to do more ,or tweak this template ,you can change these variables . Whatever change is up to your demand ,so I don't mention it here . You can read the xml file and modify it or contact me in comment form .

7,Open the blogspot dashboard . Come to Layout tab ,continue to Edit HTML ,and upload the xml file to blogspot .

How to use :

1. Breaking news section is a place where headline is posted . I make this for owner of magazine can updated news in minute . To post in Breaking news section ,just named label for your post "breakingnews"

2. Section in right-hand of breaking news for news . To show your post in this section ,just added label for your post "news"

3.To show image on gallery ,you added image in your post (one image is allowed ,do not insert more than one image in a post because gallery only show the first image in each post ) and named label for the post "gallery".

4.Subnews section is under gallery section ,it show the newest posts in each label . To change the label and post showed in each label ,open the xml file and find out code in this picture
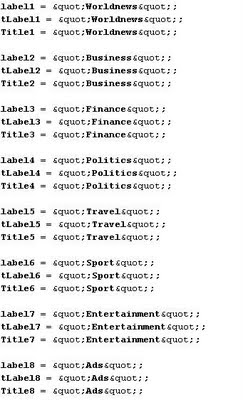
label position

Change these to labels you need

It's my second template . I don't know how to write using and setup instruction to fit your needs . So if you have any trouble or error in using ,just comment here .

adding visual lightbox to your blogspot

I have another post for lightbox effect ,with really working script . Check it out here

lightbox is a simple effect for your blog . Here is how to apply this effect to your blogspot .


Live demo in this blog


1.-Download lightbox 2.0 script in here .
-After extracting the zip file ,you got three folders :css ,images,and js .
-Upload image to a image hosting service .
-Open css file ,change the url of prevlabel.gif and nextlabel.gif to the url of images in hosting service .And do the same with js file , change the url of loading.gif and closelabel.gif
- When you finish changing image url to right location ,upload css and js file to a host . In my blog ,I uploaded all files to google pages .
2. Open your blogspot dashboard . Go to layout tab ,continue to Edit HTML . In HTML template ,add this code after ]]></b:skin> :

<script type="text/javascript" src="js/prototype.js"></script>
<script type="text/javascript" src="js/scriptaculous.js?load=effects,builder"></script>
<script type="text/javascript" src="js/lightbox.js"></script>
<link rel="stylesheet" href="css/lightbox.css" type="text/css" media="screen" />

change the address to where you host files .
3. You finish set up for lightbox effect . Each time you want to show your image with lightbox effect , just add a rel="lightbox" attribute to any link tag to activate the lightbox. For example:
<a href="images/image-1.jpg" rel="lightbox" title="my caption">image #1</a>
If you have a set of related images that you would like to group,
follow step one but additionally include a group name between square
brackets in the rel attribute. For example:

<a href="images/image-1.jpg" rel="lightbox[roadtrip]">image #1</a>
<a href="images/image-2.jpg" rel="lightbox[roadtrip]">image #2</a>
<a href="images/image-3.jpg" rel="lightbox[roadtrip]">image #3</a>
here is template integrated lightbox effect : Download


Saturday, September 19, 2009

adding searchbox to your blogspot template

  this is the screenshot of  Search Form Widget


Open your template ,and insert this code where you want searchbox appear :

<form id='searchThis' action='search' method='get'><input id='searchBox' name='q' type='text'> <input id='searchButton' value='Go' type='submit'></form>

Another way easier . You can insert a Html/javascript widget in your site and paste the code above in the content of widget .
You can customize how searchbox look by adding some CSS 
Done !

some cool widgets for your blogger

there're some widget for blogger I think very useful .It expand blogger functions ,and help you connect your readers . They are all free . Check it out :

AddThis : Sharethis or Addthis social bookmarking Sharethis social bookmarking buttonbuttons makes it easy for your visitors to share your content with others. It is a good way to increase your link popularity and publicity. Instead of inserting each social bookmark buttons in your blogspot template ,you just insert a code of addthis widget and your reader can share your post with more than 60 social bookmark networks .

whos.amung.us : This service help blogger track visitor in realtime . It display the number of visitor currently on your site and what pages they are reading .online visitor tracking widget

Web2PDF Online : I integrated this widget in my templates . This widget is so cool .It convert the content to pdf format in minutes ,and the reader can easily download the content Save Page as PDFto their computer or print it out without any troubles .


cbox
Cbox: Cbox or Chatbox is a chat widget . You can embed it in your website easily . It's another way to interact with your readers beside comment system

Google Translate: This widget lets your non-English speakingGoogle translate widget
visitors to quickly translate your webpage in their native
language with just a single click. I find out that this widget can increase the traffic of a site . I searched some word in my native language Vietnamese and I see some website ,but when I enter these site ,I realized that they are not sites in Vietnamese ,they are sites in English but installed google translate . Google translated these sites and listed in search result as Vietnamese sites . By this way ,you can attract more traffic from visitor who don't speak your site language .

How many widget did you add to your blogspot ? and do you have another interesting widgets ? tell me in comment form below .

adding favicon to your blog on blogspot

Favicon is a small image showed on the left of address bar , stand for "favorite icon" .
Favicon allow webmasters to promote their site ,and reflect the look and feel of the blog or a representation of a company logo . You can see the favicon of SimplexDesign blog is a "S" .

favicon


To make a favicon ,at first ,you need an icon . Icon can be created by some programs such as photoshop ,pain.net ,iconedit and irfanview .

If you don't have any of them ,you can access http://favicon.cc or http://www.degraeve.com/favicon/ to creating an icon online ,or you can enter http://www.faviconsr.us/and choose one for yourself from their collections . After getting icon , upload it to an image hosting .

You can use google pages for hosting your icon .

Open your template and adding these line after the <head> tag :
<link href='http://youraccount.googlepages.com/favicon.ico' rel='shortcut icon'/>
<link href='http://youraccount.googlepages.com/favicon.ico' rel='icon'/>
remember to change the links in the code above to your file links

You can use any image hosting service for hosting favicon . There are many service that automatically convert your image to .ico format and host it for you . Just make a search on Google .

Open your template in any word editor and add this line right after  <head>

<link href='http://your image url/favicon.ico' rel='icon' type='image/vnd.microsoft.icon' />


Change 'your image url' to your favicon url . Save your template ,and you are done .

best stock photo sites for you

Stock Photo sites are the place where the bloggers and websites owners search for good pictures for their articles or for their template design.

There are a lot of paid stock photo sites, and a lot of free sites where you can find really/enough good stock photos. You know that most people are using free stock photo sites, but there are and a few who use paid sites. That means that if you want you can give some $ and you will have really unique pictures for your articles, but the free stock photos are not so bad, too.


StockVault – We love to share photos


Free Royalty Free Photos, Pictures, Images and Stock Photography


OpenPhoto.net

http://l.yimg.com/g/images/logo_home.png.v2
Flickr – Photo Sharing


Stock.XCHNG,the leading FREE stock photo site!


FREEIMAGES.CO.UK- Free Stock Photos


Image * After – currently 21579 free textures and images available


Free Large Photos


NOAA Photo Library

pdphoto
PD Photo – Free Photos And Pictures


Pictures free Download

There are a lot of more stock photo sites, but i think that these are the best and with enough good photos. If you know other good sites, just post here and i will add it to this collection :)