


For the demo ,check this page on my template Simplex Newspaper II
Here is steps for making this effect :
1,Login to Blogger ,go to Dashboard ,continue to Design ,then to Edit HTML
2,Find this code :
</head>
3,Insert this script before </head>
<style>
#lightbox{ position: absolute; left: 0; width: 100%; z-index: 100; text-align: center; line-height: 0;}
#lightbox img{ width: auto; height: auto;}
#lightbox a img{ border: none; }
#outerImageContainer{ position: relative; background-color: #fff; width: 250px; height: 250px; margin: 0 auto; }
#imageContainer{ padding: 10px; }
#loading{ position: absolute; top: 40%; left: 0%; height: 25%; width: 100%; text-align: center; line-height: 0; }
#hoverNav{ position: absolute; top: 0; left: 0; height: 100%; width: 100%; z-index: 10; }
#imageContainer>#hoverNav{ left: 0;}
#hoverNav a{ outline: none;}
#prevLink, #nextLink{ width: 49%; height: 100%; background-image: url(data:image/gif;base64,AAAA); /* Trick IE into showing hover */ display: block; }
#prevLink { left: 0; float: left;}
#nextLink { right: 0; float: right;}
#prevLink:hover, #prevLink:visited:hover { background: url(https://blogger.googleusercontent.com/img/b/R29vZ2xl/AVvXsEglWCDV_-OqZ1NCHsEa_q8vp1LePq7gUCX6PkMgsmdru6Y5w19qg-e_SCNhUa_vxAYDkkWZ_OSK8KeZ5tehTk5uXxHdG2MSc6eXZTEq8h7WJrV_3RQ__D0rYJznjBDfKiWq9ukPRYKdjfk/) left 15% no-repeat; }
#nextLink:hover, #nextLink:visited:hover { background: url(https://blogger.googleusercontent.com/img/b/R29vZ2xl/AVvXsEiqSOUhCOfbOOLuUtGdXTm3CcAIhZOC_FBbCTfmqU3XJgpKzAPZl3mfDnObmMRK-XRBcbcNH7fk_LdLev18h8gsli85NkA3KtM7cXygl83c28uik2VNMHDvKbXcnM_4DktsusFj-T1uhDM/) right 15% no-repeat; }
#imageDataContainer{ font: 10px Verdana, Helvetica, sans-serif; background-color: #fff; margin: 0 auto; line-height: 1.4em; overflow: auto; width: 100% ; }
#imageData{ padding:0 10px; color: #666; }
#imageData #imageDetails{ width: 70%; float: left; text-align: left; }
#imageData #caption{ font-weight: bold; }
#imageData #numberDisplay{ display: block; clear: left; padding-bottom: 1.0em; }
#imageData #bottomNavClose{ width: 66px; float: right; padding-bottom: 0.7em; outline: none;}
#overlay{ position: absolute; top: 0; left: 0; z-index: 90; width: 100%; height: 500px; background-color: #000; }
round-color: #000; }
lute; top: 0; left: 0; z-index: 90; width: 100%; height: 500px; background-color: #000; }
round-color: #000; }
</style>
<script src='http://ajax.googleapis.com/ajax/libs/prototype/1.6.0.2/prototype.js' type='text/javascript'/>
<script src='http://files.bloggerplugins.org/lbox/js/scriptaculous.js' type='text/javascript'/>
<script src='http://blogergadgets.googlecode.com/files/lightbox.js' type='text/javascript'/>
Save template .
4,To use Lightbox effect in your post ,when editing post ,click on Edit HTML .
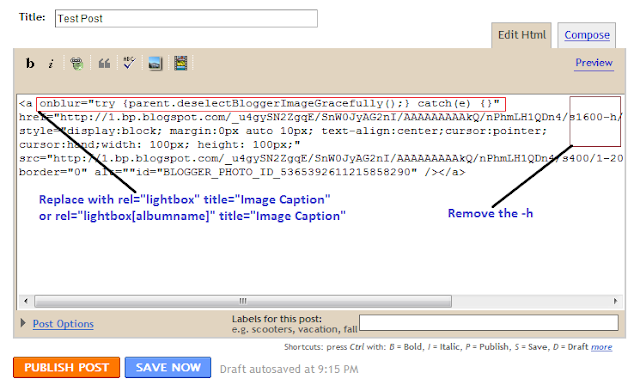
To add lightbox effect for one image ,just use rel="lightbox" title="Your image Caption" as picture above
To add lightbox effect for multiple images , use rel="lightbox[albumname]" title="Your Image Caption"
if you want to add another image to this album,upload the second image and use rel="lightbox[albumname]" title="Caption for Second image of albumname"
in this case , lightbox will work like a gallery with next and previous links and you can use keyboard to navigate through the album
That's all for Lightbox effect . I hope it work for you .
Feel free to leave me feedback ^^
---------------------------------------------------------------
This post is supported by Managed Hosting


No comments:
Post a Comment