VIEW ALL GALLERY LIGHTS

Friday, February 25, 2011

Using Jquery to make an one-time subscription pop-up


Many of bloggers said that a subscription pop-up very helpful in increasing the number of subsriber . Some bloggers such as Johnchow use subscription pop-up to show his new books and ask for subscription from readers .As you can see ,the number of subscriber in Johnchow website is very impressive .
Pop-up good or bad ? I do not mentioned here ^^


In this post ,I've just want to show you how to make a subscription pop-up for your blog . This pop-up will appear in the first-time you visit and it only appear again after several days .

Live Demo

Here are steps for making a pop-up in Blogspot

1,Open template file by go to Blogspot Dashboard ->Design ->Edit HTML . Check the box "Expand widget templates"

2,Add this CSS code right before ]]></b:skin>
#popupContactClose{
cursor: pointer;
text-decoration:none;
}
#backgroundPopup{
display:none;
position:fixed;
_position:absolute; /* hack for internet explorer 6*/
height:100%;
width:100%;
top:0;
left:0;
background:#000000;
border:1px solid #cecece;
z-index:1;
}
#popupContact{
display:none;
position:fixed;
_position:absolute; /* hack for internet explorer 6*/
height:384px;
width:408px;
background:#FFFFFF;
border:2px solid #cecece;
z-index:2;
padding:12px;
font-size:13px;
}
#popupContact h1{
text-align:left;
color:#6FA5FD;
font-size:22px;
font-weight:700;
border-bottom:1px dotted #D3D3D3;
padding-bottom:2px;
margin-bottom:20px;
}
#popupContactClose{
font-size:14px;
line-height:14px;
right:6px;
top:4px;
position:absolute;
color:#6fa5fd;
font-weight:700;
display:block;
}

3,Add this HTML code right before </body>
<div id="popupContact">
         <a id="popupContactClose">x</a>
         <h1>Pop-up title goes here</h1>         
         <p id="contactArea">
             your pop-up content and subscription form ... goes here
         </p>
     </div>
     <div id="backgroundPopup"></div>

This is HTML code of your subscription pop-up .
Replace the text in bold with title of pop-up and pop-up content .
To make this popup becomes a subscription pop-up ,you can add Feedburner subscription code into pop-up content . Like this

<div id="popupContact">
         <a id="popupContactClose">x</a>
         <h1>Subscription to SimplexDesign</h1>         
         <p id="contactArea">
             <form style="border:1px solid #ccc;padding:3px;text-align:center;" action="http://feedburner.google.com/fb/a/mailverify" method="post" target="popupwindow" onsubmit="window.open('http://feedburner.google.com/fb/a/mailverify?uri=Simplex', 'popupwindow', 'scrollbars=yes,width=550,height=520');return true">
                 <p>Enter your email address:</p>
                 <p><input type="text" style="width:140px" name="email"/></p>
                 <input type="hidden" value="Simplex" name="uri"/>
                 <input type="hidden" name="loc" value="en_US"/>
                 <input type="submit" value="Subscribe" />
             </form>

         </p>
     </div>
     <div id="backgroundPopup"></div>

The text in bold is the code of Feedburner subscription form .

You might ask me : how to get Feedburner subscription form ?
It's very easy .If you are using Feedburner ,login to your feedburner account -> click on your blog feed ->click on Publicize tab -> Click on Email Subscriptions -> Active this service -> code of subscription form is in text box .

If you do not use Feedburner ,you can add other code to pop-up content ....

4, Now it's time to add Jquery code . This code will make the pop-up work .
Add this code right before </head>

<script src="https://ajax.googleapis.com/ajax/libs/jquery/1.5.0/jquery.min.js" type="text/javascript"></script>   
<script src="http://dinhquanghuy.110mb.com/jquery.cookie.js" type="text/javascript"></script>
<script type="text/javascript">
     var popupStatus = 0;
//this code will load popup with jQuery magic!
function loadPopup(){
    //loads popup only if it is disabled
    if(popupStatus==0){
        $("#backgroundPopup").css({
            "opacity": "0.7"
        });
        $("#backgroundPopup").fadeIn("slow");
        $("#popupContact").fadeIn("slow");
        popupStatus = 1;
    }
}

//This code will disable popup when click on x!
function disablePopup(){
    //disables popup only if it is enabled
    if(popupStatus==1){
        $("#backgroundPopup").fadeOut("slow");
        $("#popupContact").fadeOut("slow");
        popupStatus = 0;
    }
}

//this code will center popup
function centerPopup(){
    //request data for centering
    var windowWidth = document.documentElement.clientWidth;
    var windowHeight = document.documentElement.clientHeight;
    var popupHeight = $("#popupContact").height();
    var popupWidth = $("#popupContact").width();
    //centering
    $("#popupContact").css({
        "position": "absolute",
        "top": windowHeight/2-popupHeight/2,
        "left": windowWidth/2-popupWidth/2
    });
    //only need force for IE6   
    $("#backgroundPopup").css({
        "height": windowHeight
    });
   
}
//CONTROLLING EVENTS IN jQuery
$(document).ready(function(){
    if ($.cookie("anewsletter") != 1) {   
        //centering with css
        centerPopup();
        //load popup
        loadPopup();   
    }       
    //CLOSING POPUP
    //Click the x event!
    $("#popupContactClose").click(function(){
        disablePopup();
        $.cookie("anewsletter", "1", { expires: 7 });
    });
    //Click out event!
    $("#backgroundPopup").click(function(){
        disablePopup();
        $.cookie("anewsletter", "1", { expires: 7 });
    });
    //Press Escape event!
    $(document).keypress(function(e){
        if(e.keyCode==27 && popupStatus==1){
            disablePopup();
            $.cookie("anewsletter", "1", { expires: 7 });
        }
    });
});
</script>

The pop-up will show if you are first-time visitor to the blog and will not displayed again  for 7 days .
With this feature ,reader will not be annoyed by pop-up each time they visit your blog . After 7 days ,the pop-up will show again to remind visitor to subscribing your blog . You can set the number of days pop-up will be appeared again by set the value of expires: 7 to other value ,for example ,expires: 6 ^^

Note : If error occured when uploading template ,you must encode the script in step 4 by copying the code ,and go to this page ,paste the code in textbox and click on encode . After that copy the result and paste it back to template file .


That's all for subscription pop-up .
You can save template and back to your blog to see the changes.
I hope this post will be helpful

Wednesday, February 23, 2011

Update : How to move images in Simplex's templates from ImageShack to another host

Many of you complaint me for trouble with imageshack.us today . Early today ,all images which hosted in Imageshack.us has been changed to ugly Frogs .
I wrote a post on how to register your domain with imageshack .But this way ,you have to wait for them to approve your site .
In this post ,I will show you the way to download all images in a Simplex's template to your PC and then upload it to another host .

Here are steps

1,First ,go to imageshack.us and register an account if you don't have one .
If you have an account existed , please login to your account .

With the new Imageshack policy ,we can only see images and download them if we are registered members . So it's the reason why we need to login to our accounts in imageshack.us .

Keep the imageshack browser window open .Do not close it .

2,Open another browser tab. Go to Blogger Dashboard ->Design ->Edit HTML,checked in Expand widget templates .
Press Ctr+F for search function and type the term "imageshack.us" into searchbox ,then enter


It will show you all link of images which were hosted in imageshack.us like picture above .

3, Copy one image link ( in the bracket ) .

Open another browser tab and paste the link into address bar .
Click enter ,it will show you the image .Right click on image and choose " save picture as " . Save this image on your hard disk.


4,Find another hosting that support image , for example , in this post ,I use Imgplace.com ( this hosting is just an example and you can use another hosting providers,paid or free ,it's up to you ) . I open imgplace.com website in another tab of browser window , choose the file and click Upload


When finish uploading ,copy the direct link


5,Back to the browser tab which template file are opening . Paste the image's direct link we got from the hosting to template file .Like this (see the arrow,new link in Imgplace.com replaced old one in Imageshack.us )


When you finish this step ,you are succesfull in moving one image from Imageshack.us to Imgplace.com hosting .

6, Do the same with other images which were hosted in Imageshack.us

All steps can do very fast , you can move an image from Imageshack to another host in less than 30 seconds .Because each template has some images ,so it only take you less than 10 minutes for all images .
Save template file and shutdown browser window .

You just finish moving all images in a Simplex's template from Imageshack.us to another hosting .
I hope this post helpful .

Update : Imageshack error unregister domain - how to fix ?

Today ,not only in SimplexDesign blog and templates,the image of "IceFrog" with text like “Your country can only view this image by logging into ImageShack” or “Unregistered domain. Go to http://imageshack.us to register” appeared everywhere . This problem was happening to all images which were linked directly to ImageShack .


If you had uploaded an image to ImageShack and posted it on your website, blog, or any other applications then the ImageShack Icefrog picture would show up.
Codes provided by Image Shack are working such as the embed link to image. We can only see the images when we login imageshack.us .If not ,we can see the icefrog .All images are locked .

The solution here is very simple , you have to register your domain to imageshack.us by visiting this page and fill all the information needed: http://stream.imageshack.us/content.php?page=email&q=reg_domain

Note that this must be done by the site owner that is being affected in order for them to verify the ownership.
When you finish submiting your site ,just wait .They will aprove your site shortly and images will be displayed as before .
With the new policy ,I think imageshack.us is not a good choice for us from now . What happen if one day ,they lock all images and ask for money .

I will try another solution and provide you images to help you host them yourself as soon as possible .
If you can't wait , you can register an account in Imageshack.us ,and login . After that open template file (xml file) and search for "imageshack.us" , it will show you link of all images that hosted in Imageshack.us . Copy all these links to download manager program (such as Internet Download Manager ,Orbit,Flashget ...) and this program will download all images for you . This is the best way for you to get all images . Remember you can do this when you have an imageshack account and you loged in .

Sunday, February 20, 2011

SimplexBuzz - one more premium template

This is my latest template SimplexBuzz . This template has a eye-catching feature slider ,and I think it's good for travel/art/photography blog .

Live Demo | Download

Here are steps to install this template


1,Download template file

2,Open template file in any word editor you have .

3,To change the credit box at the end of each post

find this code
<div id="authorbox">
<h3>About Author</h3>
<img width="60" height="60" class="avatar avatar-60 photo" src="https://blogger.googleusercontent.com/img/b/R29vZ2xl/AVvXsEil4WuM8VNbUjLfBk2X2jq2Xqk09xT39RO-Z5PHYW59m3B_DuYurJvZ_71oVdJHX0DGrsHZerhGP_5Ysr8rcBUnEHS8RF5_FAnbwQiU4BejYJLHHSA6SuGzu4La-tGtW00UTYGFpo_RZdO1/s220/normal_HNH_9244-sapa0207.jpg" alt=""/>
<div class="authortext">
<h4>
<a href="">Nhamnganhanh</a>
</h4>
<p>This is template SimplexBuzz .
</p>
</div>
</div>

Change the text in bold to what you want (you can write some description about you and your blog ...)

4, To add your feedburner account to email subscription form

find this code
<form onsubmit="window.open('http://feedburner.google.com/fb/a/mailverify?uri=simplex', 'popupwindow', 'scrollbars=yes,width=550,height=520');return true" target="popupwindow" method="post" action="http://feedburner.google.com/fb/a/mailverify">
                                  <fieldset>
                                     <input type="hidden" name="uri" value="simplex"/>
                                     <input type="hidden" value="en_US" name="loc"/>
                                     <input type="text" name="email" class="sub"/>
                                     <button type="submit">Submit</button>
                                 </fieldset>
                             </form>
change the text in bold 'simplex' to your feed burner account .

5,To add your social network accounts

find this code
<ul class="social">
                                 <li><a class="twitter" href="http://twitter.com/dinhquanghuy">Twitter</a></li>
                                 <li><a class="facebook" href="http://facebook.com/simplexdesignblog">Facebook</a></li>
                                 <li><a class="flickr" href="http://flickr.com/photos/">Flickr</a></li>
                                 <li class="rss"><a class="rss" href="/feeds/posts/default">RSS</a></li>
                             </ul>
change the links (marked in bold) to your social network accounts.

6,After that ,upload template to Blogger .

7,To add your logo

click on logo widget

then add your logo into widget content as I did in picture below

Click Save

8,To add items to top menu navigation

click edit link in category widget

then add link to your category into widget content like this

Link to category in blogspot has structure : http://yourblogspot.blogspot.com/search/label/your category

9,To add content to feature slider

Click on edit link in 'feature content slider' widget
Then add the name category which you want to show recent posts in feature content slider in widget content
for example ,I want to show recent posts under 'travel' category into feature content slider ,I click edit link in 'feature content slider' widget

then fill the widget content with name of category 'travel'

Save changes . From now ,4 latest posts in category 'travel' will be showed in feature slider

10,To show post in feature content section below slider

click on edit link in feature content widget

add name of category you want to show into widget content

Then save changes . Recent posts in this category will be showed in feature content section .

11,In this template , when you enter a single post ,the first image in this post will be showed as background in header automatically .
But when you enter a page ,there's no image displayed in header .
To add image in the header of pages

click on edit link in 'background for page' widget

and add the image into widget content .

From now ,the image you added will be showed as header's background each time you enter a page .

12,To add the text in alert box

click on edit link in 'alert' widget

and enter the text you want to show .

You can use HTML tags to make text in alert box display as you want .

13,To add your ad,click on edit link in banner widget

and add your ad code into widget content .


14, That's all for default widgets .You can add more widget or remove existed as you want .

Save all changes ,and you are done .I hope you all like this template and keep supporting me .
Feel free to use my template but please keep the credit at footer .Thanks in advance .

Update : As question from YUSUF left in my blog related to problems on long post titles and width of post in home page ,here is the solution
Find this

div.post h2.storyTitle {
color: #000000;
float: none;
font-size: 2.6em;
font-weight: bold;
line-height: 120%;
margin-bottom: 5px;
width: 585px;
}
and delete width: 585px;
Then find

div.post div.storyContent {
float: none;
margin-bottom: 20px;
width: 585px;
}
delete width: 585px;
To fix the problem with recent posts/comments tab when post title is long :
First ,find this

div#sidebar div.tabsContainer ul.panes ul li h4 {
left: 70px;
position: absolute;
top: 15px;
}
and delete all of them
Second ,find this

div#sidebar div.tabsContainer ul.panes ul li p.meta {
bottom: 0;
color: #85837E;
font-size: 0.9em;
left: 70px;
line-height: 120%;
overflow: hidden;
position: absolute;
}
Then change it to

div#sidebar div.tabsContainer ul.panes ul li p.meta {
color: #85837E;
font-size: 0.9em;
line-height: 120%;
margin-left: 60px;
}

the last step : Find this

div#sidebar div.tabsContainer ul.panes ul.comments li h4 {left:35px; width:250px;}
And replace it with

div#sidebar div.tabsContainer ul.panes ul.comments li h4 {
margin-left: 20px;
}

Friday, February 11, 2011

SimplexEnews - the latest version - fixed errors ,easy to install

This is the latest version for SimplexEnews template ,that is fixed some errors occured .Easy to install and customize via widget in Page Elements


Live Demo | Download template file with Disqus | Download template file without Disqus

Here is steps to install this template

1,Download this template

2,Open template file in a word editor

3,To make a menu navigation

find this code
<div id='cat-menu'>
             <ul class='sf-menu nav' id='cat-nav'>
                 <li><a href='http://simplexenews1.blogspot.com/'>Home</a></li>
                 <li><a href='http://simplexenews1.blogspot.com/search/label/world'>World</a></li>
                 <li><a href='http://simplexenews1.blogspot.com/search/label/US'>US</a></li>
                 <li><a href='http://simplexenews1.blogspot.com/search/label/business'>Business</a>
                     <ul>
                         <li><a href=''>Category</a>
                             <ul>
                                 <li><a href=''>Category</a></li>
                                 <li><a href=''>Category</a></li>
                                 <li><a href=''>Category</a></li>
                                 <li><a href=''>Category</a></li>
                             </ul>                     
                         </li>
                         <li><a href=''>Category</a></li>
                         <li><a href=''>Category</a></li>
                         <li><a href=''>Category</a></li>
                     </ul>
                 </li>
                 <li><a href='http://simplexenews1.blogspot.com/search/label/entertainment'>Entertainment</a></li>
                 <li><a href='http://simplexenews1.blogspot.com/search/label/Sports'>Sports</a></li>
                 <li><a href='http://simplexenews1.blogspot.com/search/label/tech'>Technology</a></li>
                 <li><a href='http://simplexenews1.blogspot.com/search/label/editor'>Editor&#39;s picks</a></li>
                 <li><a href='http://simplexenews1.blogspot.com/search/label/story'>Top Stories</a>
                     <ul>
                         <li><a href=''>Category</a></li>
                         <li><a href=''>Category</a></li>
                         <li><a href=''>Category</a></li>
                         <li><a href=''>Category</a></li>
                     </ul>
                  </li>
             </ul>                     
         </div>

and edit the text in bold to the name and url of your categories . Link to each category has structure
http://your blog.blogspot.com/search/label/category-name

4,This is the code of credit box at the end of each post :

<div class='clear' id='entry-author'>
                                         <div id='author-avatar'>
                                             <img alt='' height='60' src='http://0.gravatar.com/avatar/4c2ed72c6be86742f05e9750110d5731?s=60&amp;d=http%3A%2F%2F0.gravatar.com%2Favatar%2Fad516503a11cd5ca435acc9bb6523536%3Fs%3D60&amp;r=G' width='60'/>       
                                         </div> <!--end .author-avatar-->
                                         <div id='author-description'>
                                             <h3>About author</h3>
                                             Curabitur at est vel odio aliquam fermentum in vel tortor. Aliquam eget laoreet metus. Quisque auctor dolor fermentum nisi imperdiet vel placerat purus convallis.       
                                         </div> <!--end .author-description-->
                                     </div> <!--end .entry-author-->


Edit the text in bold to the text you want (you can change it ,add link to your profile ,translate it to your language )

5,If you choose the template file with Disqus comment system ,find this code 
<script type='text/javascript'>
    /* * * CONFIGURATION VARIABLES: EDIT BEFORE PASTING INTO YOUR WEBPAGE * * */
    var disqus_shortname = &#39;simplexenews&#39;; // required: replace example with your forum shortname

    /* * * DON&#39;T EDIT BELOW THIS LINE * * */
    (function () {
        var s = document.createElement(&#39;script&#39;); s.async = true;
        s.type = &#39;text/javascript&#39;;
        s.src = &#39;http://&#39; + disqus_shortname + &#39;.disqus.com/count.js&#39;;
        (document.getElementsByTagName(&#39;HEAD&#39;)[0] || document.getElementsByTagName(&#39;BODY&#39;)[0]).appendChild(s);
    }());
</script>   

and this code :

<b:includable id='comments' var='post'>
                             <div id='disqus_thread'/>
<script type='text/javascript'>
    /* * * CONFIGURATION VARIABLES: EDIT BEFORE PASTING INTO YOUR WEBPAGE * * */
    var disqus_shortname = &#39;simplexenews&#39;; // required: replace example with your forum shortname

    // The following are highly recommended additional parameters. Remove the slashes in front to use.
    // var disqus_identifier = &#39;unique_dynamic_id_1234&#39;;
    // var disqus_url = &#39;http://example.com/permalink-to-page.html&#39;;

    /* * * DON&#39;T EDIT BELOW THIS LINE * * */
    (function() {
        var dsq = document.createElement(&#39;script&#39;); dsq.type = &#39;text/javascript&#39;; dsq.async = true;
        dsq.src = &#39;http://&#39; + disqus_shortname + &#39;.disqus.com/embed.js&#39;;
        (document.getElementsByTagName(&#39;head&#39;)[0] || document.getElementsByTagName(&#39;body&#39;)[0]).appendChild(dsq);
    })();
</script>
<noscript>Please enable JavaScript to view the <a href='http://disqus.com/?ref_noscript'>comments powered by Disqus.</a></noscript>

 </b:includable>

and this code
<div class='dsq-widget' id='recentcomments'>&lt;script type=&quot;text/javascript&quot; src=&quot;http://simplexenews.disqus.com/recent_comments_widget.js?num_items=5&amp;hide_avatars=0&amp;avatar_size=32&amp;excerpt_length=200&quot;&gt;&lt;/script&gt;</div>

change the text 'simplexenews' (marked in bold) to your Disqus shortname .This step is required because if you don't change this text ,it mean you are using my Disqus account ,so I can delete your comment
Now ,save template and upload it to blogger .

6, To add logo to this template


click edit link in logo widget


and add link to your logo in widget content


7,To add your social network accounts


click on 'edit' link in Social Networks widget 


and add link to your social network accounts .


8,'topads','Midads' ,'ads2' are widgets for advertising .

You can click on 'edit' link of these widgets


and add the ad code into widget content . Like this


9,To show posts under a category in the slider:

click on 'edit' link in 'Looped Slider' widget

add the title you want to show into widget title ,and add the name of category into widget content .

In these pictures above ,I want to show posts in 'feature' category into slider ,so I add category name 'feature' into widget content and add the title 'feature' into widget title .

10,Do the same with other widgets . Click on 'edit' link in a widget ,add a category name into widget content and add the title you want to show in widget title . Recent posts in this category will be shown in where the widget you choose is .
For example ,I want to show posts under category 'US' in the position of widget 'Two col-right'
First ,I click on 'edit' link in 'Two col-right'

a dialog appeared, then , I add the category name 'US' into widget content ,and add the title I want to show 'US' into widget title .

After that ,click Save .

If the category 'US' existed in my blog ,and there is at least one post under category 'US' ,it will be displayed in the position of 'Two col-right'

11,Do the same with the carousel

For example ,I want to show posts under category 'headline' in the position of carousel widget 
First ,I click on 'edit' link in 'Carousel'

a dialog appeared .
Then ,I add the category name 'headline' into widget content ,and add the title I want to show 'headline' into widget title .

After that ,click Save .
The posts under 'headline' category will be shown in carousel widget

12,To add video

click on edit link in video widget

add video embed code into widget content


13,To add photos to Flickr widget

click on edit link in Flickr widget

add Flickr id into widget content


14,To add Category ,Blogroll


you can click on edit link in these widget ,for example Category widget

add link you want


15,To add a forum to blog,create a new page ,name it 'forum' and paste the forum embeded code into page content (in Edit HTML mode)


then go to Dashboard -> Go to Design -> Edit HTML ,search for the text 'http://simplexenews1.blogspot.com/p/forum.html'

and replace it with link to 'forum' page you've just created .There are 3 places need to change in total . After that ,save the changes .

Here are places need to change 'http://simplexenews1.blogspot.com/p/forum.html' with the link to your forum page :
1st place :

2nd place

3rd place

That's all .Save template and you will see a full-width forum page .

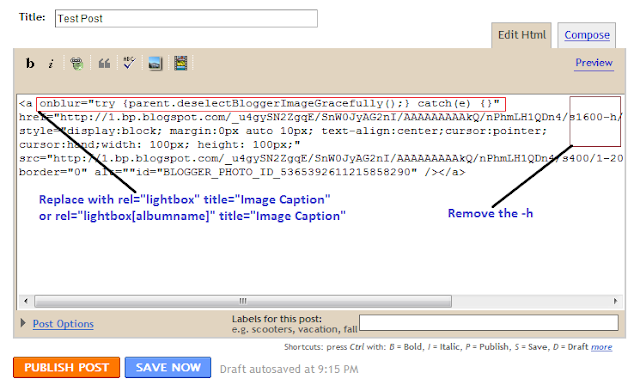
16, Lightbox effect has been integrated in this template

To use Lightbox effect in your post ,when editing post ,click on Edit HTML .

To add lightbox effect for one image , use rel="lightbox" title="Your image Caption" as picture above
To add lightbox effect for multiple images , use rel="lightbox[albumname]" title="Your Image Caption"
if you want to add another image to this album,upload the second image and use rel="lightbox[albumname]" title="Caption for Second image of albumname" 
in this case , lightbox will work like a gallery with next and previous links  and you can use keyboard to navigate through the album

17,If you want to increase/decrease the number of post in each category ,go to Design ->edit HTML -> checked Expand widget templates ,and find these variables in template file :

numposts  = 6;
numposts1 = 3;
numposts2 = 6;
numposts3 = 4;
numposts5 = 5;
numposts6 = 10;
try to change these values to what you need .

That's all for this template . You can add / remove widgets or change the position in Page Elements