VIEW ALL GALLERY LIGHTS

Wednesday, March 30, 2011

Use Google web font to styling header and text in your blog

If you are using default Blogspot templates ,you can use Template Designer to set special fonts for header and text .But this function is not available if you are using a custom template . So how can we embed special fonts to blog ?


As you may know ,Template Designer in Blogspot use Google font for applying special fonts to blog .In this post ,I will show you how to use Google Font for styling text in blog without Template Designer ,just need some lines of code .

You can see demo here ( my template Simplex Newspro )

Here are steps :

1,Go to this site ,and select the font you like .

2,When move your mouse over the font ,you will see the text "Click here to embed...." .Click on this text .A new page appear . Click on Use this font tab


3,You will see two lines :


The first line is something like this  :
<link href='http://fonts.googleapis.com/css?family=xxxxx' rel='stylesheet' type='text/css'>
xxxxx is the font name . Copy this line and paste right before <b:skin><![CDATA[/* in template file . An important thing : you must add an slash ( / ) at the end of this line ,like that
<link href='http://fonts.googleapis.com/css?family=xxxxx' rel='stylesheet' type='text/css'/>
If not ,you will see an error message .

The second line you get in Google web font page is something like this :
h1 { font-family: 'xxxx',xxxxx; }
xxx are font name and style of the font .
 This line illustrate how the font you choose applied to h1 tag .

To applied the font you choose to an element in blog ,find CSS code of this element , and add the attribute  font-family: 'xxxx',xxxxx; into element's CSS attributes

For example ,in my live demo I applied new font to post title in template Simplex Newspro .
Here are steps I did :
First ,I go to this website ,and choose the font Indie Flower
 
Click on "click here to embed Indie Flower"
 
Second ,I go to Dashboard - > Design ->Edit HTML ->Checked on Expand widget templates
Add the first line to embed font Indie Flower


After that ,add the font-family attribute to element I want to apply new font in CSS section


That's all .Save template and new font will be appeared .

In this post ,I just want to show you how to use Google font to embed new fonts to blog . It's very easy if you are familliar with CSS ,work with CSS or customize templates before . If you are a newbie and don't know where to insert font-family attributes to applied new font for an element,you can make a comment . I can help if possible .

Sunday, March 20, 2011

Should we use Disqus or not ?

In renewed version of templates ,I always make two file ,one template file with Blogger default comment system and the other with Disqus comment system . You might ask me what we should chose for our blog ? In this post ,I will write something about them and I hope it helpful to your decision .


Disqus is a modern comment system for website and blog .It enhance the commenting system on your blog and designed to make commenting more exciting and interesting. It's a realtime comment system and you can see your comment show up immediately . With Disqus ,you can reply to an existed comment and interact with comments by votes ,keep tracks on comments with email notification ,you can also link to media files in your comments ,embed video,audio ... in comment ,and you can use Gravatar . Disqus allow you to comment in mobile ,sharing comments in social networks,and build a good community with commnunity box and comment profile .And I have to say that it really easy to install and using ,I can import export comments,moderate them in Dashboard and prevent spam with their anti-spam technology . If you use Blogger and install Disqus comment system ,you blog look really professional .

But Disqus is not perfect ,it's an embeded comment system ,and work base on Ajax and javascript ,so it make your blog load slower or can not load if there's error in connection .Sometime ,Disqus script can conflict with other scripts ,therefore,they can't work . Another important thing I see that Disqus is not good for SEO . All comments in blog using Disqus can't be indexed by Google . Disqus said their system are SEO friendly ,but I do not think so .

Blogger default comment system is on other side . It's really a boring comment system . Look simple and straight,no interaction ,no sharing tool ,no connection to other networks and no threaded comment . But it load fast and good for SEO . SEO here mean I can make a search in Google and see comment in search result . And we can customize it,make it display as we want with a little CSS and  code .Not so good but acceptable (as my templates ^^)

Here is list of good and bad for Blogger and Disqus that I see . I hope you can share your own experience with these comment systems and give advice to choose one for blog to others . Thanks in advance

Sunday, March 13, 2011

Update for Subscription pop-up

In comments of my previous post "Using Jquery to make an one-time subscription pop-up" ,YellOblog said that he want the pop-up appear after an amount of time and the pop-up is always at the center of viewport .Thanks YellOblog for the suggestion . Here is the complete code for your request :


Live Demo

To make a Subscription Pop-up ,you can read my post  "Using Jquery to make an one-time subscription pop-up" and follow steps from 1 to 3 .

For the step 4 - Jquery code ,replace the code in the post "Using Jquery to make an one-time subscription pop-up"
with this one

<script src="https://ajax.googleapis.com/ajax/libs/jquery/1.5.0/jquery.min.js" type="text/javascript"></script>  
<script src="http://dinhquanghuy.110mb.com/jquery.cookie.js" type="text/javascript"></script>
<script type="text/javascript">
         var popupStatus = 0;

//loading popup with jQuery magic!
function loadPopup(){
    centerPopup();
    //loads popup only if it is disabled
    if(popupStatus==0){
        $("#backgroundPopup").css({
            "opacity": "0.7"
        });
        $("#backgroundPopup").fadeIn("slow");
        $("#popupContact").fadeIn("slow");
        popupStatus = 1;
    }
}

//disabling popup with jQuery magic!
function disablePopup(){
    //disables popup only if it is enabled
    if(popupStatus==1){
        $("#backgroundPopup").fadeOut("slow");
        $("#popupContact").fadeOut("slow");
        popupStatus = 0;
    }
}

//centering popup
function centerPopup(){
    //request data for centering
    var windowWidth = document.documentElement.clientWidth; 
    var windowHeight = document.documentElement.clientHeight; 
    var windowscrolltop = document.documentElement.scrollTop;
    var windowscrollleft = document.documentElement.scrollLeft;
    var popupHeight = $("#popupContact").height();
    var popupWidth = $("#popupContact").width();
    var toppos = windowHeight/2-popupHeight/2+windowscrolltop;
    var leftpos = windowWidth/2-popupWidth/2+windowscrollleft;
    //centering
    $("#popupContact").css({
        "position": "absolute",
        "top": toppos,
        "left": leftpos
    });
    //only need force for IE6
   
    $("#backgroundPopup").css({
        "height": windowHeight
    });
   
}


//CONTROLLING EVENTS IN jQuery
$(document).ready(function(){
    if ($.cookie("anewsletter") != 1) {   
       
        //load popup
        setTimeout("loadPopup()",5000);   
    }       
    //CLOSING POPUP
    //Click the x event!
    $("#popupContactClose").click(function(){
        disablePopup();
        $.cookie("anewsletter", "1", { expires: 7 });
    });
    //Click out event!
    $("#backgroundPopup").click(function(){
        disablePopup();
        $.cookie("anewsletter", "1", { expires: 7 });
    });
    //Press Escape event!
    $(document).keypress(function(e){
        if(e.keyCode==27 && popupStatus==1){
            disablePopup();
            $.cookie("anewsletter", "1", { expires: 7 });
        }
    });

});
</script>

pay attention to this line setTimeout("loadPopup()",5000);
5000 is the delay time in millisecond . You can set another value if you want .
That's all . I hope this update can fill your requests and make the subscription pop-up more profesional. You can check it out yourself and see the result .

Wednesday, March 9, 2011

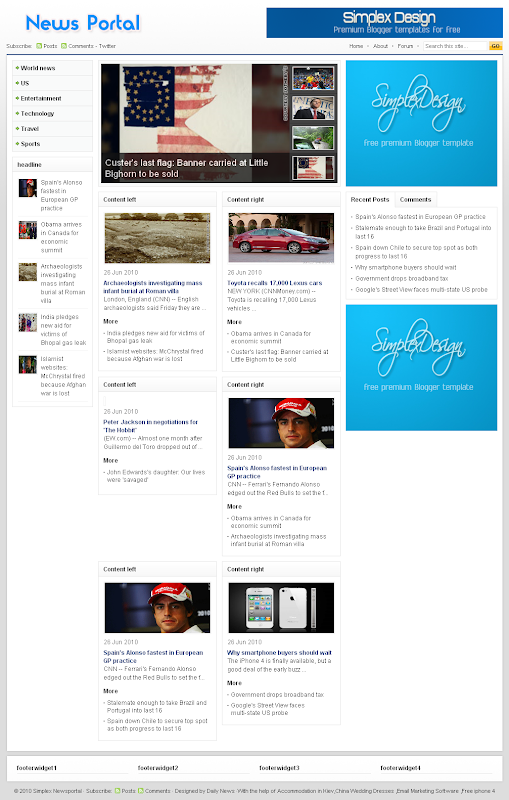
SimplexNewsportal - renewed version

Here is the renewed version of my template SimplexNewsportal . It's a good template for magazine and newsportal . I tried my best to make it easier to install and use .
There are two file for this template ,one with Disqus comment system and the other not .I added images folder to template package ,so if you want ,you can host images yourself


Live Demo | Download template with Disqus comment system | Download template with Blogger comment system

Here are steps for installing this template

1,Download template file .

2,If you want to use Disqus comment system
Open this template in a word editor and change the text in bold in this code
 <script type='text/javascript'>
    /* * * CONFIGURATION VARIABLES: EDIT BEFORE PASTING INTO YOUR WEBPAGE * * */
    var disqus_shortname = &#39;simplexcelebs&#39;; // required: replace example with your forum shortname

    // The following are highly recommended additional parameters. Remove the slashes in front to use.
    // var disqus_identifier = &#39;unique_dynamic_id_1234&#39;;
    // var disqus_url = &#39;http://example.com/permalink-to-page.html&#39;;

    /* * * DON&#39;T EDIT BELOW THIS LINE * * */
    (function() {
        var dsq = document.createElement(&#39;script&#39;); dsq.type = &#39;text/javascript&#39;; dsq.async = true;
        dsq.src = &#39;http://&#39; + disqus_shortname + &#39;.disqus.com/embed.js&#39;;
        (document.getElementsByTagName(&#39;head&#39;)[0] || document.getElementsByTagName(&#39;body&#39;)[0]).appendChild(dsq);
    })();
</script>

and this code

<div class='dsq-widget' id='recentcomments'>&lt;script type=&quot;text/javascript&quot; src=&quot;http://simplexenews.disqus.com/recent_comments_widget.js?num_items=5&amp;hide_avatars=0&amp;avatar_size=32&amp;excerpt_length=200&quot;&gt;&lt;/script&gt;</div>
to your Disqus shortname .This step is required . If you choose template file without Disqus ,you can skip this step .

3,Upload template to Blogger

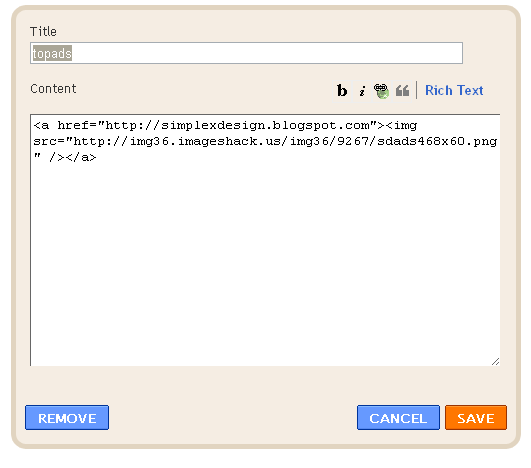
4,To add logo


click on edit link in logo widget

add logo into widget content like this

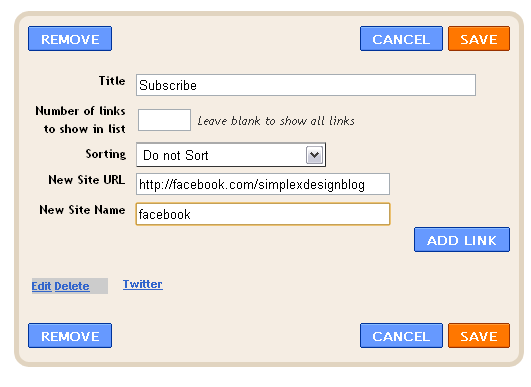
5,To add  link to your social network

click on Subscribe widget

add link to your social network accounts.

6,To add items to menu

click on edit link in menu widget

add link to your categories

Link to category in blogspot has structure http://yourblog.blogspot.com/search/label/category name

7,To show content in headline widget

click on edit link in headline widget

add the name of category you want to show in this widget

8,To show content in feature content slider

click on edit link in feature content slider

add name of category you want to show in slider into widget content

9,Do the same for content left ,content right widgets .Just add a category name into widget content ,and recent posts in this category will be shown in widget's position in homepage .

10,Top ads,ads1 ,ads2 are widgets for advertisment . To add your ads

click on edit link

add your ad code into widget content .

11,You can add your own widgets if you want

12, To add a forum ,create a page (Go to Dashboard-Posting tab ->Edit Pages,click on new page) , name it "forum" and then paste the forum embeded code into page content (in Edit HTML mode)


After that , go to Dashboard -> Go to Design -> Edit HTML ,search for the text 'http://simplexnewsportal1.blogspot.com/p/forum.html'

and replace it with link to 'forum' page you've just created .There are 3 places need to change in total .
1st place
1st
2nd
2nd
3rd
3rd
After that ,save the changes .

13,To increase/decrease the number of post in each category ,go to Design ->edit HTML -> checked Expand widget templates ,and find these variables in template file :
numposts = 3;
numposts1 = 4;
numposts2 = 6;

try to change these values to what you need .
That's all for this template . I hope you like this re-newed version .

Saturday, March 5, 2011

Auto apply lightbox effect to all images

In my blog ,DJ Remix Town asked me for how to auto applied Lightbox effect to all images uploaded ,do not need to edit HTML and add rel="lightbox" manually. And now I have the answer for this question :

How to do this ?

First ,you need to read this post and follow all my instruction for install jquery lightbox to blog .

The magic is on the second step ,find and replace this code
<script type="text/javascript">
$(function() {
$('a[rel*=lightbox]').lightBox();
});
</script>

with this

<script type="text/javascript">
$(function() {
$('a[href$=jpg], a[href$=JPG], a[href$=jpeg], a[href$=JPEG], a[href$=png], a[href$=gif], a[href$=bmp]:has(img)').lightBox();
});
</script>

The difference between them is this line $('a[href$=jpg], a[href$=JPG], a[href$=jpeg], a[href$=JPEG], a[href$=png], a[href$=gif], a[href$=bmp]:has(img)').lightBox(); 
This line mean Lightbox effect will be applied to all <a ...> tag which has an <img> tag inside ,and the href attribute of a tag is a link to image file (with the extension : gif,bmp,jpeg,png,jpg)

From now ,you can upload and insert images to your post using uploader in post editor window and don't care for the rest . Lightbox effect will be applied to all images .