


There are two template files for this version ,one with Disqus comment system and the other without .

Live Demo | Download SimplexCelebrity with Disqus | Download SimplexCelebrity without Disqus
Here is steps for installing this template
1, Download template file from links above .Choose template file with Disqus comment system if you want to use Disqus ,or choose the other if not .
2,If you choose template file with Disqus comment system ,open template file in a word editor such as Notepad ++ and find this block code :
<div id='disqus_thread'/>
<script type='text/javascript'>
/* * * CONFIGURATION VARIABLES: EDIT BEFORE PASTING INTO YOUR WEBPAGE * * */
var disqus_shortname = 'simplexcelebs'; // required: replace example with your forum shortname
// The following are highly recommended additional parameters. Remove the slashes in front to use.
// var disqus_identifier = 'unique_dynamic_id_1234';
// var disqus_url = 'http://example.com/permalink-to-page.html';
/* * * DON'T EDIT BELOW THIS LINE * * */
(function() {
var dsq = document.createElement('script'); dsq.type = 'text/javascript'; dsq.async = true;
dsq.src = 'http://' + disqus_shortname + '.disqus.com/embed.js';
(document.getElementsByTagName('head')[0] || document.getElementsByTagName('body')[0]).appendChild(dsq);
})();
</script>
<noscript>Please enable JavaScript to view the <a href='http://disqus.com/?ref_noscript'>comments powered by Disqus.</a></noscript>
and this block
<script type='text/javascript'>
/* * * CONFIGURATION VARIABLES: EDIT BEFORE PASTING INTO YOUR WEBPAGE * * */
var disqus_shortname = 'simplexcelebs'; // required: replace example with your forum shortname
/* * * DON'T EDIT BELOW THIS LINE * * */
(function () {
var s = document.createElement('script'); s.async = true;
s.type = 'text/javascript';
s.src = 'http://' + disqus_shortname + '.disqus.com/count.js';
(document.getElementsByTagName('HEAD')[0] || document.getElementsByTagName('BODY')[0]).appendChild(s);
}());
</script>
change the text in bold "simplexcelebs" to your Disqus shortname .
Save template ,and upload it to Blogger .
3,Go to Blogger Dashboard ->Design->Page Element .In this page ,you will see many widgets .
4,To add logo to your blog

Click on logo widget

and fill widget content with link to logo as what I did in image below

5,To add items to menu bar

click on edit link in menu bar widget

and add link to categories in your blog as I did in the image

Link to each category has structure : http://yourblog.blogspot.com/search/label/your category
6,'top ads','sidebarads' are widgets for advertising . You can click on 'edit' link of these widgets and add the ad code into widget content . Like this


7,To add content to slider

click on edit link in "feature slider" widget

write the title you want to show in widget title
and write the name of category which you want to show in slider in widget content
for example ,in the picture below ,I want to show content of category "feature" in slider ,so I add title "feature slider" into widget title and add category name "feature" into widget content . And recent posts from "feature" category will be shown in slider .

8,Do the same with other widgets . Click on 'edit' link in a widget ,add category name into widget content and add the title you want to show in widget title . Recent posts in this category will be shown in where the widget you choose is .
for example ,I want to show posts in "music" in the position of widget "category box 2"
First ,I click on edit link in "category box 2" widget

a dialog appeared . I add category name "music" into widget content ,and add "MUSIC" in the widget title

after that ,click Save .
Here is what we have after editing :

9,To add a forum to blog,create a new page ,name it 'forum' and paste the forum embeded code into page content (in Edit HTML mode)

then go to Dashboard -> Go to Design -> Edit HTML ,search for the text
'http://simplexcelebs.blogspot.com/p/forum.html'
you will find out these block code :
<b:if cond='data:blog.url != "http://simplexcelebs.blogspot.com/p/forum.html"'>
<b:section id='sidebar' class="widget1" showaddelement='yes'>
<b:widget id='HTML14' locked='false' title='Subscribe' type='HTML'>

and
<b:if cond='data:blog.url != data:blog.homepageUrl'>
<b:if cond='data:blog.url == "http://simplexcelebs.blogspot.com/p/forum.html"'>
<div id="fullcontent">
<b:loop values='data:posts' var='post'>

Change "http://simplexcelebs.blogspot.com/p/forum.html" to your forum page's url .
10,Lightbox effect has been integrated in this template

To use Lightbox effect in your post ,when editing post ,click on Edit HTML .
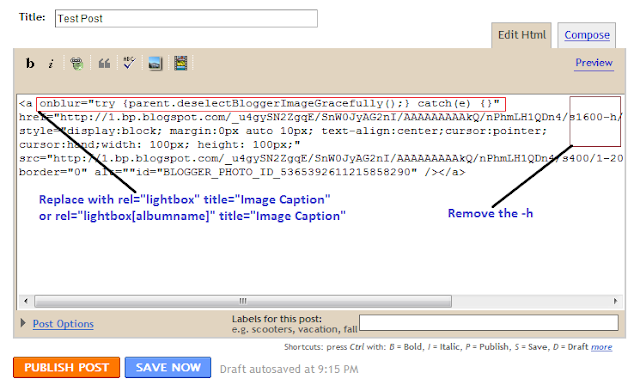
To add lightbox effect for one image , use rel="lightbox" title="Your image Caption" as picture above
To add lightbox effect for multiple images , use rel="lightbox[albumname]" title="Your Image Caption"
if you want to add another image to this album,upload the second image and use rel="lightbox[albumname]" title="Caption for Second image of albumname"
in this case , lightbox will work like a gallery with next and previous links and you can use keyboard to navigate through the album
That's all for this template .I hope you enjoy this version ^^


