VIEW ALL GALLERY LIGHTS

Thursday, February 10, 2011

Ultimate Guide to Get approved by Google Adsense

This is a guest post by my friend SAHL AHMED who is a tech geek and a SEO expert and Founder of Humor And technology Blog – HumorTechBlog.Com
 
Most of the new bloggers step into blogging only because of Google Adsense . They think that they can make some money from their blog with Google adsense. But when they don’t get approved by adsense they are left with only one choice to quit blogging.
In this post ,I will show you the method to get approved by Google Adsense.
First of all , I assume you know what Google Adsense is the importance of Google Adsense to blogger's life .Here's a small summary if you never heard about Adsense .
What is Google Adsense?
Google.com earns most of revenue by allowing other website owners to advertise on their search result pages. This is managed through a program called Google AdWords.
Now you can earn a share of the revenue that Google earns from AdWords by displaying ads on your site. In other words, you're helping Google advertise and they pay you a percentage of what they earn.

This revenue sharing program is called Google AdSense.
It is the highest paying PPC (pay per click) program.


Who can join adsense?

Adsense is FREE to Join if your website passes its CRITERIAS

There are many criterias
1.Your website should be 6 months old
2.It should have be a Top level Domain
Click HERE for the list of criterias


How much time would it take to get adsense approved by using this method?

1. 15 To 30 days or maximum 2 months
2. Implementation of 14 Steps.


You have to implement 14 points below in order to make your blog/website ready for Google Adsense and get approved quickly :

1. Start a Blog on blogger.com Or use ur existing blog.

2. Put a cool and soothing template ..not too flashy and but too simple. It should look professional.

3. Buy a Custom domain (top level domain i.e (.COM) to publish your blogger blog on it. It should have a Name which relates to your blog . It will cost you some money but worth to do . (Google doesn't accept domains with .blogspot.com nowaday)

Tip: search on google for "How to use custom domain on blogger"


4.Write 20-30 good articles about your niche . If you can't , go to any article directory ( like Ezine etc ...) ,get articles and rewrite them in a very different way .
Tip: The more Orignal content , the better are the chances but don't rush and put a lot of articles.

5. An about me/Us page and a privacy policy page is a must-have and link to these pages should be seen on your homepage.

6. Put a neat and clean EMAIL subscription Box and a Blog archive widget.

7. Submit your website to Google , Bing , Yahoo and other search engines.

8. Bookmark your website in google and submit to Digg .
Tip : - never submit more than 15 links to Digg at a time if you don't want to get a ban !
        - follow and get followers before submitting to Digg.

9. Make a Facebook fan page ,a Twitter account and a youtube channel in your blog or your website name. If not ,try your name .

Tip: Put a link – “FOLLOW US On twitter" clickable image or a Facebook like box on your blog!

10. Get some Facebook fans and Twitter followers by inviting fellow bloggers , friends , family , relatives . Upload 5-10 videos on Youtube and get some views.
Tip: Add a link at the start of your video description and at Twitter / Facebook about us page.
There are 2 ways by which you can get views to your video.
1. White hat method – By uploading original video tutorials or funny or cool videos which are made by you.
2. Black hat method- This method includes re-uploading of latest videos which have less views till now and which are good enough to get a lot of views.

I don’t encourage black hat method so for more information please contact me .

11. Share every post of you on Facebook profile and to Twitter followers , ask them to visit your website often.

12.Make an account on flixya.com and upload 10 videos or more .The same which you uploaded on youtube.
Tip : put your website link in all the videos on bottom of original description.
After uploading 10 videos or more you can apply for Adsense via flixya.com by going to the monetize tab.

13.Get traffic to you blog ( get as much as u can after applying for adsense as they check your website traffic)

Traffic sources :
-.Search engines
-.forums
-.twitter
-.facebook profile and fan page
-.youtube
-.flixya.com
-.Email marketing

14.( Most important )You should apply by flixya.com and by your website also ,on the same day.

Fill in all the details properly as it is difficult to change it after approval

15. If you apply the second time after getting banned or disapproved : make small changes in your ADDRESS and apply again..
e.g make co op ..co operative or make opp --> opposite or vice – versa.


What will happen after applying : The trick ?
As youtube and flixya.com are Google revenue sharing platforms , Google will check the both these .
So if your making an improvement at 3 places ,you will become a good publisher to invest in + you have a blog /webisite which is worthy of showing ads . Therefore it approves you.

PLAN A TIME TABLE FOR ALL THIS SO THAT IT DOESN’T BECOME STRESSFULL
This is not an illegal method ,I've just shared what helped me to get an adsense account.

Please note:
-Wait for 10-12 days before applying from flixya.com.
-While making an account on flixya.com or youtube use the email address by which your are gonna apply for adsense.

Now that you know all the things needed to make a powerfull blog.
Start now and rock it.

Thank you for your precious time.

About Author

SAHL AHMED a tech geek and a

SEO expert . Founder of Humor And technology Blog – HumorTechBlog.Com

For reference :

Blog : http://www.humortechblog.com/

Youtube : http://www.youtube.com/user/sahlcooool

Flixya : http://www.flixya.com/user/sahlcoolio

Twitter : http://twitter.com/HumorTechBlog

Facebook fan page: http://www.facebook.com/HumorTechBlog

Digg : http://digg.com/sahlsmash

Sunday, February 6, 2011

Simplex Transcript - renewed version

Simplex Transcript is a good template for an online portal or magazine . There's a lot of people download this template from Simplexdesign and use this template for their website . There are some bugs has been reported . Thanks you all for this.
In this post ,I want to introduce renewed version of Simplex Transcript template  which is easier for you to install and customize ,fixed some bugs ,reduce loading time ,supported lightbox effect ,and a full-width page .
Simplex Transcript template screenshot

Live Demo | Download template file with Disqus | Download template file without Disqus

Here is steps to install this template


1,Download this template

2,Open template file

3,To make your main menu navigation

find this code
<div id='navcats'>
             <ul>
                 <li>
                     <a href='http://simplextranscript.blogspot.com'>Home</a>
                 </li>
                 <li>
                     <a href='/search/label/world'>World News</a>
                     <ul class='children'>
                         <li><a href='#'>Category</a></li>
                         <li><a href='#'>Category</a></li>
                         <li><a href='#'>Category</a></li>
                     </ul>
                 </li>
                 <li><a href='/search/label/sports'>Sports</a></li>
                 <li><a href='/search/label/finance'>Finance</a>
                     <ul class='children'>
                         <li><a href='#'>Category</a></li>
                         <li><a href='#'>Category</a></li>
                         <li><a href='#'>Category</a></li>
                     </ul>
                 </li> 
                 <li><a href='/search/label/entertainment'>Entertainment</a>
                      <ul class='children'>
                         <li><a href='#'>Category</a></li>
                         <li><a href='#'>Category</a></li>
                         <li><a href='#'>Category</a></li>
                     </ul>
                 </li>
                 <li><a href='/search/label/business'>Business</a></li>                    
             </ul>         
         </div>
and edit the text in bold to the name and url of your categories . Link to each category has structure
http://your blog.blogspot.com/search/label/category-name

4,This is the code of credit box at the end of each post
<div id='entryMeta'>
                                         <img alt='' class='avatar avatar-39 photo' height='39' src='https://blogger.googleusercontent.com/img/b/R29vZ2xl/AVvXsEhVsvnEJ1z4RYZve8h9x3EdHwDIN5lF2XeUcSnQZN6D-h0em7ZWHymHUA-taKwUqQUp5cJCJNj77rLMYjAH6GcKISaLztvdxBvc2PSNzQtpthaDXqWFx6JTVB4Ms8NXkXdWx4JCkg_ftAW2/s45/normal_HNH_9244-sapa0207.jpg' width='39'/>       
                                         Posted by <data:post.author/>
                                         on <data:post.timestamp/>. Filed under
                                         <b:loop values='data:post.labels' var='label'>
                                             <a expr:href='data:label.url' rel='tag'><data:label.name/></a><b:if cond='data:label.isLast != &quot;true&quot;'>,</b:if>
                                         </b:loop>.
                                         You can follow any responses to this entry through the <a href='/feeds/posts/default/'>RSS 2.0</a>.
                                         Feel free to leave a response
                                         <div class='clear'/>   
                                     </div>       


Edit the text in bold to the text you want (you can change it ,add link to your profile ,translate it to your language )

5,If you choose the template file with Disqus comment system
find this code
<script type='text/javascript'>
/* * * CONFIGURATION VARIABLES: EDIT BEFORE PASTING INTO YOUR WEBPAGE * * */
var disqus_shortname = &#39;simplexblognews&#39;; // required: replace example with your forum shortname

/* * * DON&#39;T EDIT BELOW THIS LINE * * */
(function () {
var s = document.createElement(&#39;script&#39;); s.async = true;
s.type = &#39;text/javascript&#39;;
s.src = &#39;http://&#39; + disqus_shortname + &#39;.disqus.com/count.js&#39;;
(document.getElementsByTagName(&#39;HEAD&#39;)[0] || document.getElementsByTagName(&#39;BODY&#39;)[0]).appendChild(s);
}());
</script>

and this code

<b:includable id='comments' var='post'>
<div id='disqus_thread'/>
<script type='text/javascript'>
/* * * CONFIGURATION VARIABLES: EDIT BEFORE PASTING INTO YOUR WEBPAGE * * */
var disqus_shortname = &#39;simplexblognews&#39;; // required: replace example with your forum shortname

// The following are highly recommended additional parameters. Remove the slashes in front to use.
// var disqus_identifier = &#39;unique_dynamic_id_1234&#39;;
// var disqus_url = &#39;http://example.com/permalink-to-page.html&#39;;

/* * * DON&#39;T EDIT BELOW THIS LINE * * */
(function() {
var dsq = document.createElement(&#39;script&#39;); dsq.type = &#39;text/javascript&#39;; dsq.async = true;
dsq.src = &#39;http://&#39; + disqus_shortname + &#39;.disqus.com/embed.js&#39;;
(document.getElementsByTagName(&#39;head&#39;)[0] || document.getElementsByTagName(&#39;body&#39;)[0]).appendChild(dsq);
})();
</script>
<noscript>Please enable JavaScript to view the <a href='http://disqus.com/?ref_noscript'>comments powered by Disqus.</a></noscript>

</b:includable>

then change the text in bold "simplexblognews" to your Disqus shortname . This step is required because if you don't change this text ,it mean you are using my Disqus account ,so I can delete your comment (hehe ^^)

Now save template .Upload it to Blogger

6,To add logo to this template

click on edit link in logo widget


and add link to your logo in widget content


7,To add your social network account


click on 'edit' link in Stay Connected widget


and add link to your social network accounts .


8,'top ads','Top sidebar ads' ,'primarybottom sidebar','home sidebar ads' are widgets for advertising . You can click on 'edit' link of these widgets

and add the ad code into widget content . Like this


9,To show posts under a category in the slider:

click on 'edit' link in 'feature content slider' widget

add the title you want to show into widget title ,and add the name of category into widget content .


In these pictures above ,I want to show posts in 'feature' category into slider ,so I add category name 'feature' into widget content and add the title 'feature' into widget title .

10,Do the same with other widgets . Click on 'edit' link in a widget ,add a category name into widget content and add the title you want to show in widget title . Recent posts in this category will be shown in where the widget you choose is .

For example ,I want to show posts under category 'Politic' in the position of widget 'top mid col'

First ,I click on 'edit' link in 'top mid col'

a dialog appeared .
then ,I add the category name 'politic' into widget content ,and add the title I want to show 'POLITIC' into widget title .

After that ,click Save .

If the category 'politic' existed in my blog ,and there is at least one post under category 'politic' ,it will be displayed in the position of 'top mid col'

11,Do the same with the tab bar

For example ,I want to show posts under category 'cycling' in the position of tab number 1 in the tab bar
First ,I click on 'edit' link in 'priBotTab1'


a dialog appeared .


then ,I add the category name 'cycling' into widget content ,and add the title I want to show 'Cycling' into widget title .

After that ,click Save .

The posts under "cycling" category will be shown in tab1 of the tab bar .

12,In Page Element ,we can also setup widgets which will be shown in single page (post page)
this is a single page


and this is widgets for a single page in page element


In the single page ,post will be shown in the left-hand ,a narrow sidebar in the middle and a wide sidebar in the right .
Narrow sidebar contain widgets : Blog Archive,Label ,and Custom script .
Wide Sidebar contain widgets : Custom script ,Recent comment widesidebar ,recent post widesidebar,and Popular post 

You can't add more widget to these sidebars . But you can remove widget existed .
If you want to add any script to single page (like ad script,counter script ...) add them into Custom script widget content .
Click edit link in Custom script widget
Add script into widget content .


13,To add a forum to blog,create a new page ,name it 'forum' and paste the forum embeded code into page content (in Edit HTML mode)


then go to Dashboard -> Go to Design -> Edit HTML ,search for the text 'http://simplextranscript.blogspot.com/p/forum.html'

and replace it with link to 'forum' page you've just created .There are 8 places need to change in total . After that ,save the changes .

Here are places need to change 'http://simplextranscript.blogspot.com/p/forum.html' with the link to your forum page :

1st place :


2nd place


3rd place


4th place


5th place


6th place


7th place


8th place


That's all .Save template and you will see a full-width forum page .

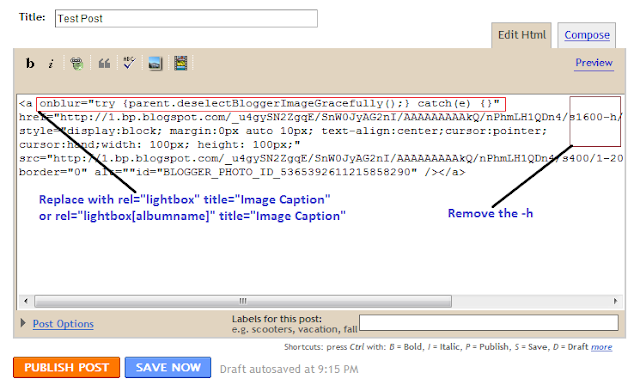
14,Lightbox effect has been integrated in this template

To use Lightbox effect in your post ,when editing post ,click on Edit HTML .

To add lightbox effect for one image , use rel="lightbox" title="Your image Caption" as picture above
To add lightbox effect for multiple images , use rel="lightbox[albumname]" title="Your Image Caption"
if you want to add another image to this album,upload the second image and use rel="lightbox[albumname]" title="Caption for Second image of albumname" 
in this case , lightbox will work like a gallery with next and previous links  and you can use keyboard to navigate through the album

That's all for this template .I hope it helpful to you 

Saturday, January 29, 2011

SimplexCelebrity renewed version

In this post ,I want to show you renewed version of my template Simplex Celebrity ,which is more easy to install ,bugs fixed ,loading faster ,a forum wide-page and SEO friendly .
There are two template files for this version ,one with Disqus comment system and the other without .


Live Demo | Download SimplexCelebrity with Disqus | Download SimplexCelebrity without Disqus

Here is steps for installing this template


1, Download template file from links above .Choose template file with Disqus comment system if you want to use Disqus ,or choose the other if not .

2,If you choose template file with Disqus comment system ,open template file in a word editor such as Notepad ++ and find this block code :

<div id='disqus_thread'/>
<script type='text/javascript'>
    /* * * CONFIGURATION VARIABLES: EDIT BEFORE PASTING INTO YOUR WEBPAGE * * */
    var disqus_shortname = &#39;simplexcelebs&#39;; // required: replace example with your forum shortname

    // The following are highly recommended additional parameters. Remove the slashes in front to use.
    // var disqus_identifier = &#39;unique_dynamic_id_1234&#39;;
    // var disqus_url = &#39;http://example.com/permalink-to-page.html&#39;;

    /* * * DON&#39;T EDIT BELOW THIS LINE * * */
    (function() {
        var dsq = document.createElement(&#39;script&#39;); dsq.type = &#39;text/javascript&#39;; dsq.async = true;
        dsq.src = &#39;http://&#39; + disqus_shortname + &#39;.disqus.com/embed.js&#39;;
        (document.getElementsByTagName(&#39;head&#39;)[0] || document.getElementsByTagName(&#39;body&#39;)[0]).appendChild(dsq);
    })();
</script>
<noscript>Please enable JavaScript to view the <a href='http://disqus.com/?ref_noscript'>comments powered by Disqus.</a></noscript>

and this block

<script type='text/javascript'>
    /* * * CONFIGURATION VARIABLES: EDIT BEFORE PASTING INTO YOUR WEBPAGE * * */
    var disqus_shortname = &#39;simplexcelebs&#39;; // required: replace example with your forum shortname

    /* * * DON&#39;T EDIT BELOW THIS LINE * * */
    (function () {
        var s = document.createElement(&#39;script&#39;); s.async = true;
        s.type = &#39;text/javascript&#39;;
        s.src = &#39;http://&#39; + disqus_shortname + &#39;.disqus.com/count.js&#39;;
        (document.getElementsByTagName(&#39;HEAD&#39;)[0] || document.getElementsByTagName(&#39;BODY&#39;)[0]).appendChild(s);
    }());
</script>

change the text in bold "simplexcelebs" to your Disqus shortname .
Save template ,and upload it to Blogger .

3,Go to Blogger Dashboard ->Design->Page Element .In this page ,you will see many widgets .

4,To add logo to your blog
simplexcelebrity add logo
Click on logo widget
simplexceblebrity add logo
and fill widget content with link to logo as what I did in image below


5,To add items to menu bar


click on edit link in menu bar widget

and add link to categories in your blog as I did in the image


Link to each category has structure : http://yourblog.blogspot.com/search/label/your category

6,'top ads','sidebarads' are widgets for advertising . You can click on 'edit' link of these widgets and add the ad code into widget content . Like this


7,To add content to slider
simplexcelebrity slider
click on edit link in "feature slider" widget
simplexcelebrity slider
write the title you want to show in widget title
and write the name of category which you want to show in slider in widget content
for example ,in the picture below ,I want to show content of category "feature" in slider ,so I add title "feature slider" into widget title and add category name "feature" into widget content . And recent posts from "feature" category will be shown in slider .


8,Do the same with other widgets . Click on 'edit' link in a widget ,add category name into widget content and add the title you want to show in widget title . Recent posts in this category will be shown in where the widget you choose is .
for example ,I want to show posts in "music" in the position of widget "category box 2"

First ,I click on edit link in "category box 2" widget

a dialog appeared . I add category name "music" into widget content ,and add "MUSIC" in the widget title

after that ,click Save .
Here is what we have after editing :


9,To add a forum to blog,create a new page ,name it 'forum' and paste the forum embeded code into page content (in Edit HTML mode)


then go to Dashboard -> Go to Design -> Edit HTML ,search for the text
'http://simplexcelebs.blogspot.com/p/forum.html'
you will find out these block code  :

 <b:if cond='data:blog.url != &quot;http://simplexcelebs.blogspot.com/p/forum.html&quot;'>
         <b:section id='sidebar' class="widget1" showaddelement='yes'>
             <b:widget id='HTML14' locked='false' title='Subscribe' type='HTML'>


and

     <b:if cond='data:blog.url != data:blog.homepageUrl'>
                         <b:if cond='data:blog.url == &quot;http://simplexcelebs.blogspot.com/p/forum.html&quot;'>
                             <div id="fullcontent">
                                 <b:loop values='data:posts' var='post'>

Change "http://simplexcelebs.blogspot.com/p/forum.html" to your forum page's url .

10,Lightbox effect has been integrated in this template

lightbox effect in Simplex Celebrity template

To use Lightbox effect in your post ,when editing post ,click on Edit HTML .

To add lightbox effect for one image , use rel="lightbox" title="Your image Caption" as picture above
To add lightbox effect for multiple images , use rel="lightbox[albumname]" title="Your Image Caption"
if you want to add another image to this album,upload the second image and use rel="lightbox[albumname]" title="Caption for Second image of albumname" 
in this case , lightbox will work like a gallery with next and previous links  and you can use keyboard to navigate through the album

That's all for this template .I hope you enjoy this version ^^